Get all of the details for creating a classic kitchen design that will feel fresh and beautiful for years to come. This cream kitchen is timeless and traditional, while working beautifully for a modern family.
Learn the secrets to renovating with a classic kitchen design. A timeless kitchen is possible to achieve – this guide will help you get there! Look to historical classic kitchen designs to help illuminate the process.
Find inspiration for classic kitchen design, including cabinets, countertops, storage, flooring, sinks, faucets, hardware and more. Before you know it, you’ll be creating the timeless kitchen of your dreams!
When we began our kitchen remodel several years ago, there was one thing I knew I wanted. I wanted to capture the feeling of a truly timeless kitchen. I wanted it to look as though it could have been here 100 years ago, 50 years ago… and hopefully even 100 years from now!
We have a traditional style home with lots of doorways and one tiny window in the kitchen. I didn’t want to impede on any walkways, but we had some goals to make the effort and expense of a remodel feel worthwhile.
I hope this helps you to take elements of timeless kitchens into consideration. While it can be fun to design a trendy, modern space, I think that designing a classic kitchen can actually be more difficult. That’s because you’re always trying to think ahead and also look back to historical references.
I know it’s so helpful to refer to remodeling projects that others have completed in their homes, so I am including all the details plus before and after photos here. You can also visualize our kitchen by watching the video.
From Dated to Classic
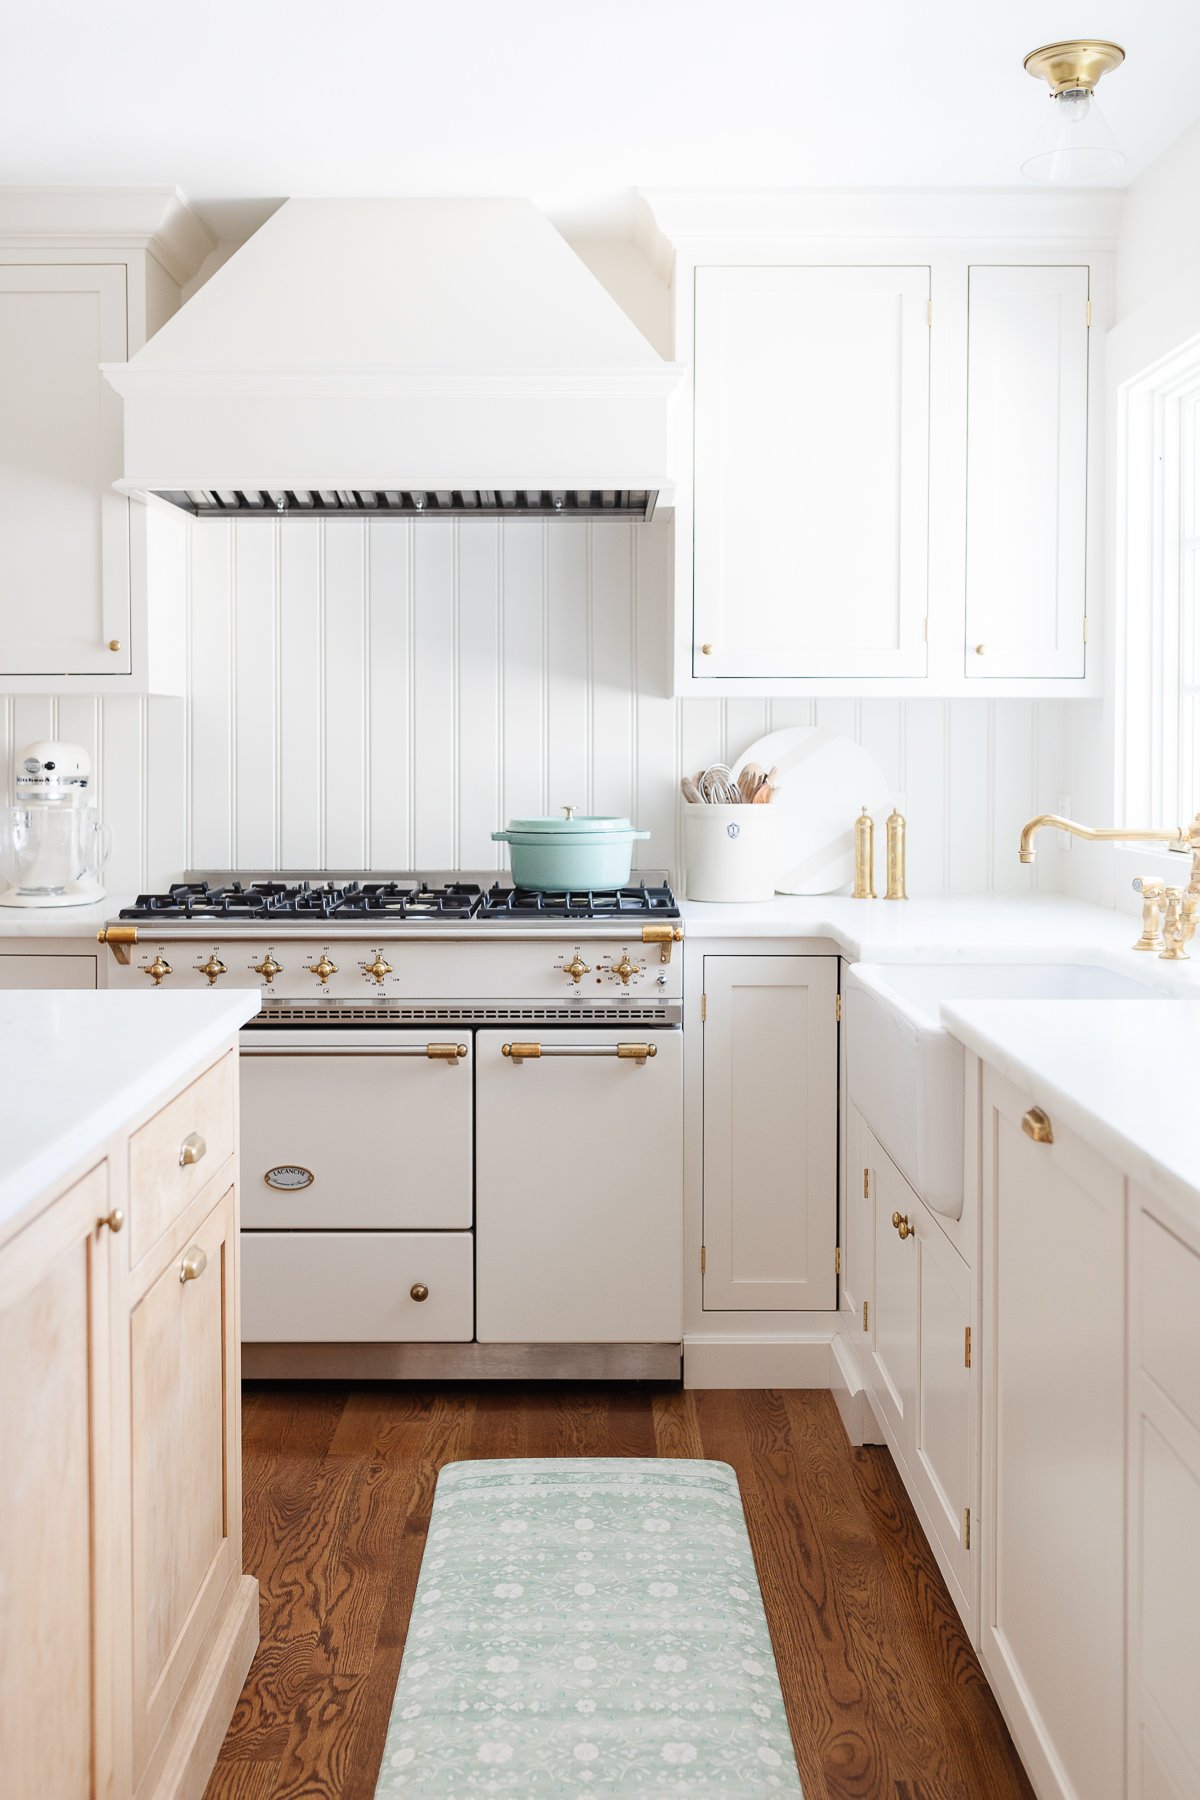
Like so many kitchens, our new kitchen was inspired by need for function as well as design. It was small, dark and dated. Accessible cabinet space was limited and awkward display shelves consumed valuable space.
It’s not easy to make classic kitchen design choices, that’s for sure! When we undertook this full scale renovation, we knew that it might be a bumpy road.
We chose to be our own construction manager and our own designer… leaving the labor up to the pros but the decisions up to us.
A classic kitchen is possible with some study of timeless kitchens of the past, and narrowing in on the work of your favorite kitchen designers. For us, that was always deVOL Kitchens.
I love the look of a classic English kitchen. Functional, but warm and timeless. They always nail it, and I drew a lot of inspiration from their most timeless kitchen designs.
As you’ll see in the categories below, choosing your favorite elements can quickly help you to narrow in on a design style you love. Check out our gallery of “before” shots!
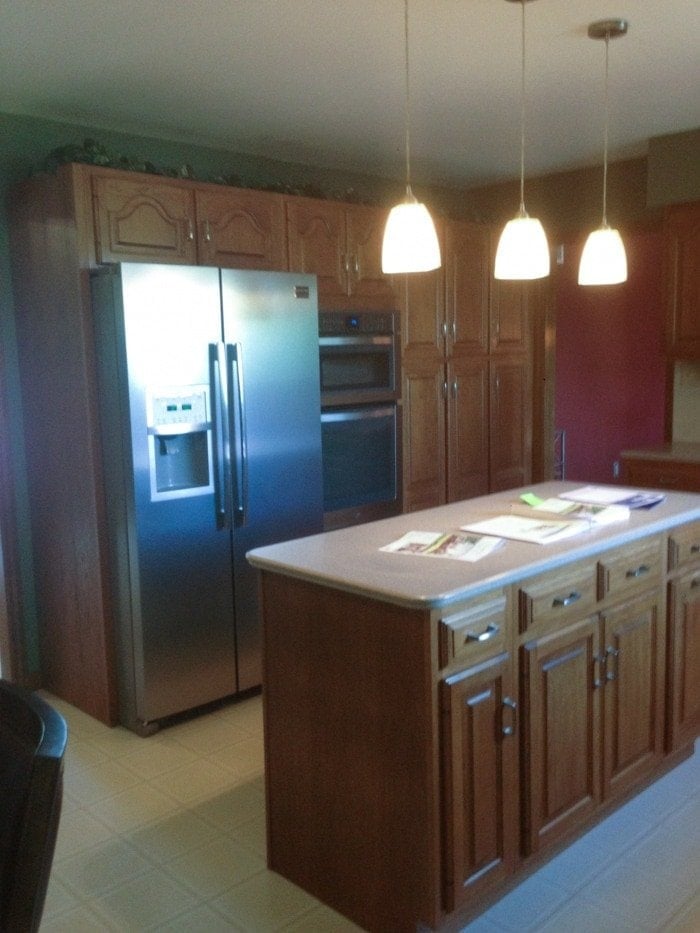
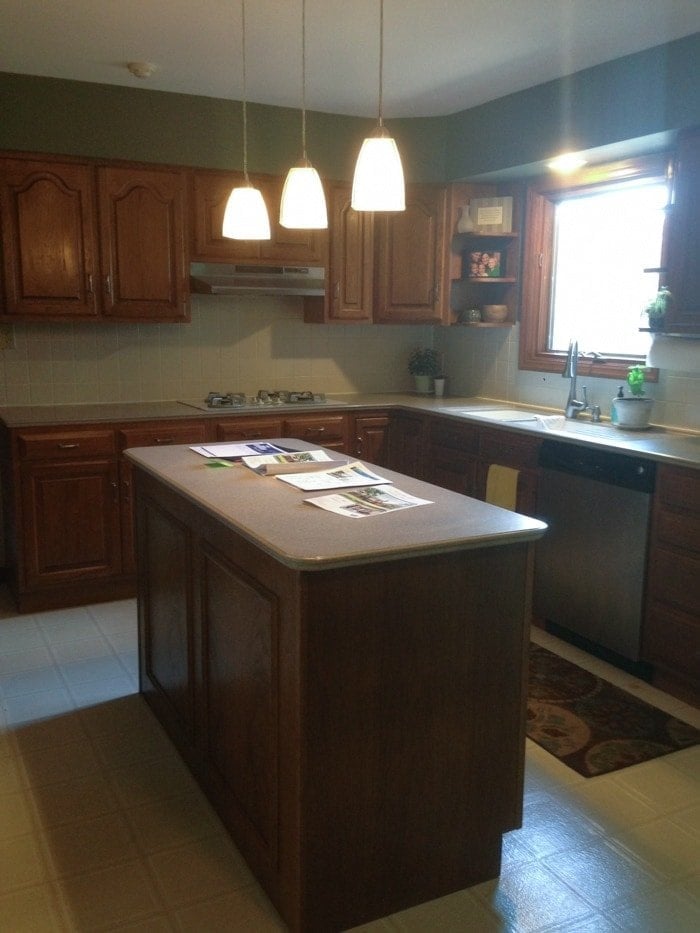
One small window and a 2.5″ doorway limited the amount of natural light from flowing in and dark cabinets and paint color only made it appear darker. Thankfully, we’re so in love with our new classic kitchen!
Classic Kitchen Design Elements
This post breaks down the elements of a classic kitchen into categories. You’ll find details about each of our choices: island guidelines, flooring, cabinetry, countertops, lighting, hardware, appliances and more.
Shaker Kitchen Cabinets
Design Guides, Decor & Tips
Shaker Cabinets
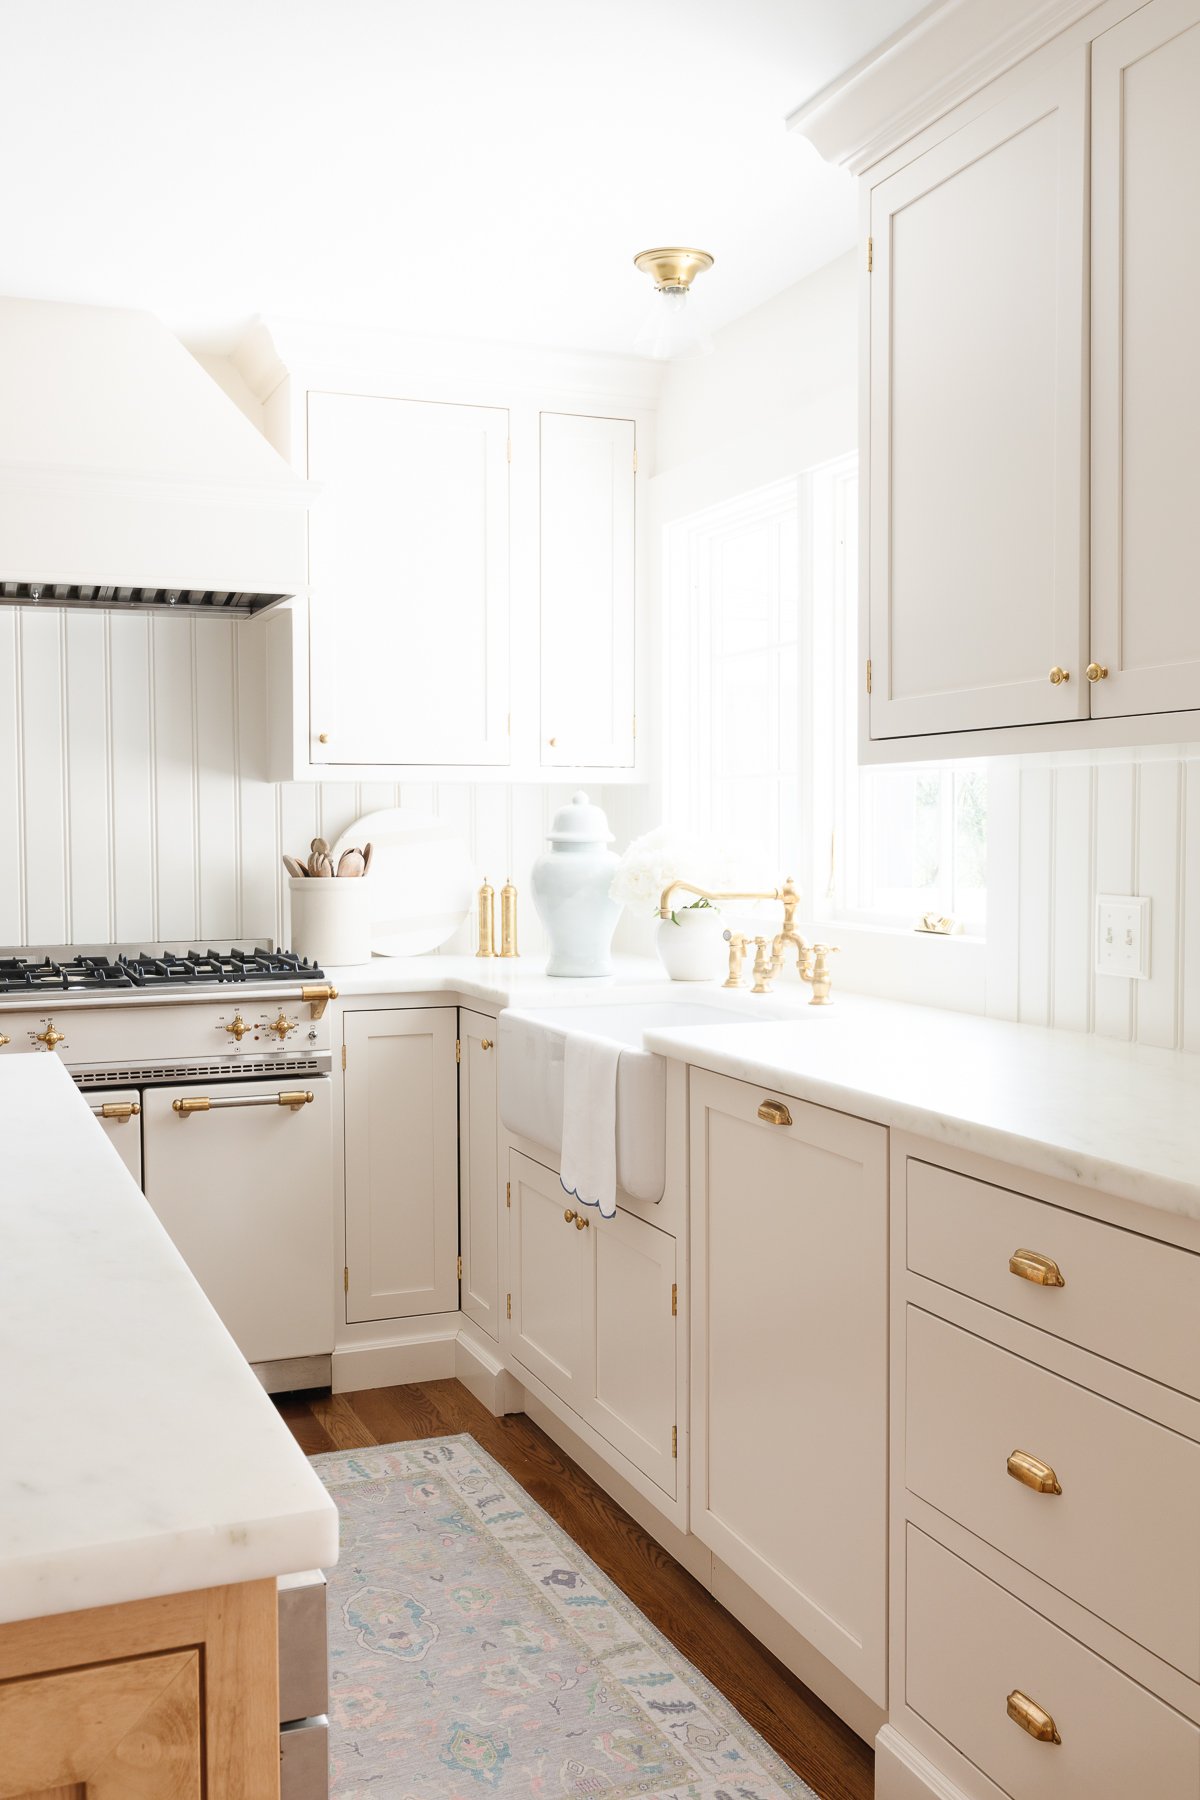
Shaker Cabinets are a classic, timeless type of cabinetry that blend with a wide range of kitchen styles. Whether you are planning a traditional, cottage, farmhouse or contemporary kitchen, shaker cabinets will work for you! Read More
It’s timeless, easy to clean and streamlined. The shaker kitchen cabinets integrate into our home effortlessly, coordinating with our shaker style doors.
Shaker kitchen cabinets work well for traditional, farmhouse, and modern kitchens. We had ours custom made but they’re accessible through most cabinet makers, kitchen stores and hardware stores.
Shaker cabinets are made with very simple construction. Each cabinet door is made with a flat board, four pieces to frame and lack a bevel.
We had ours finished with furniture style trim baseboard to give it a truly built in, finished aesthetic. The space under our sink and dishwasher have a toe kick for comfort and convenience.
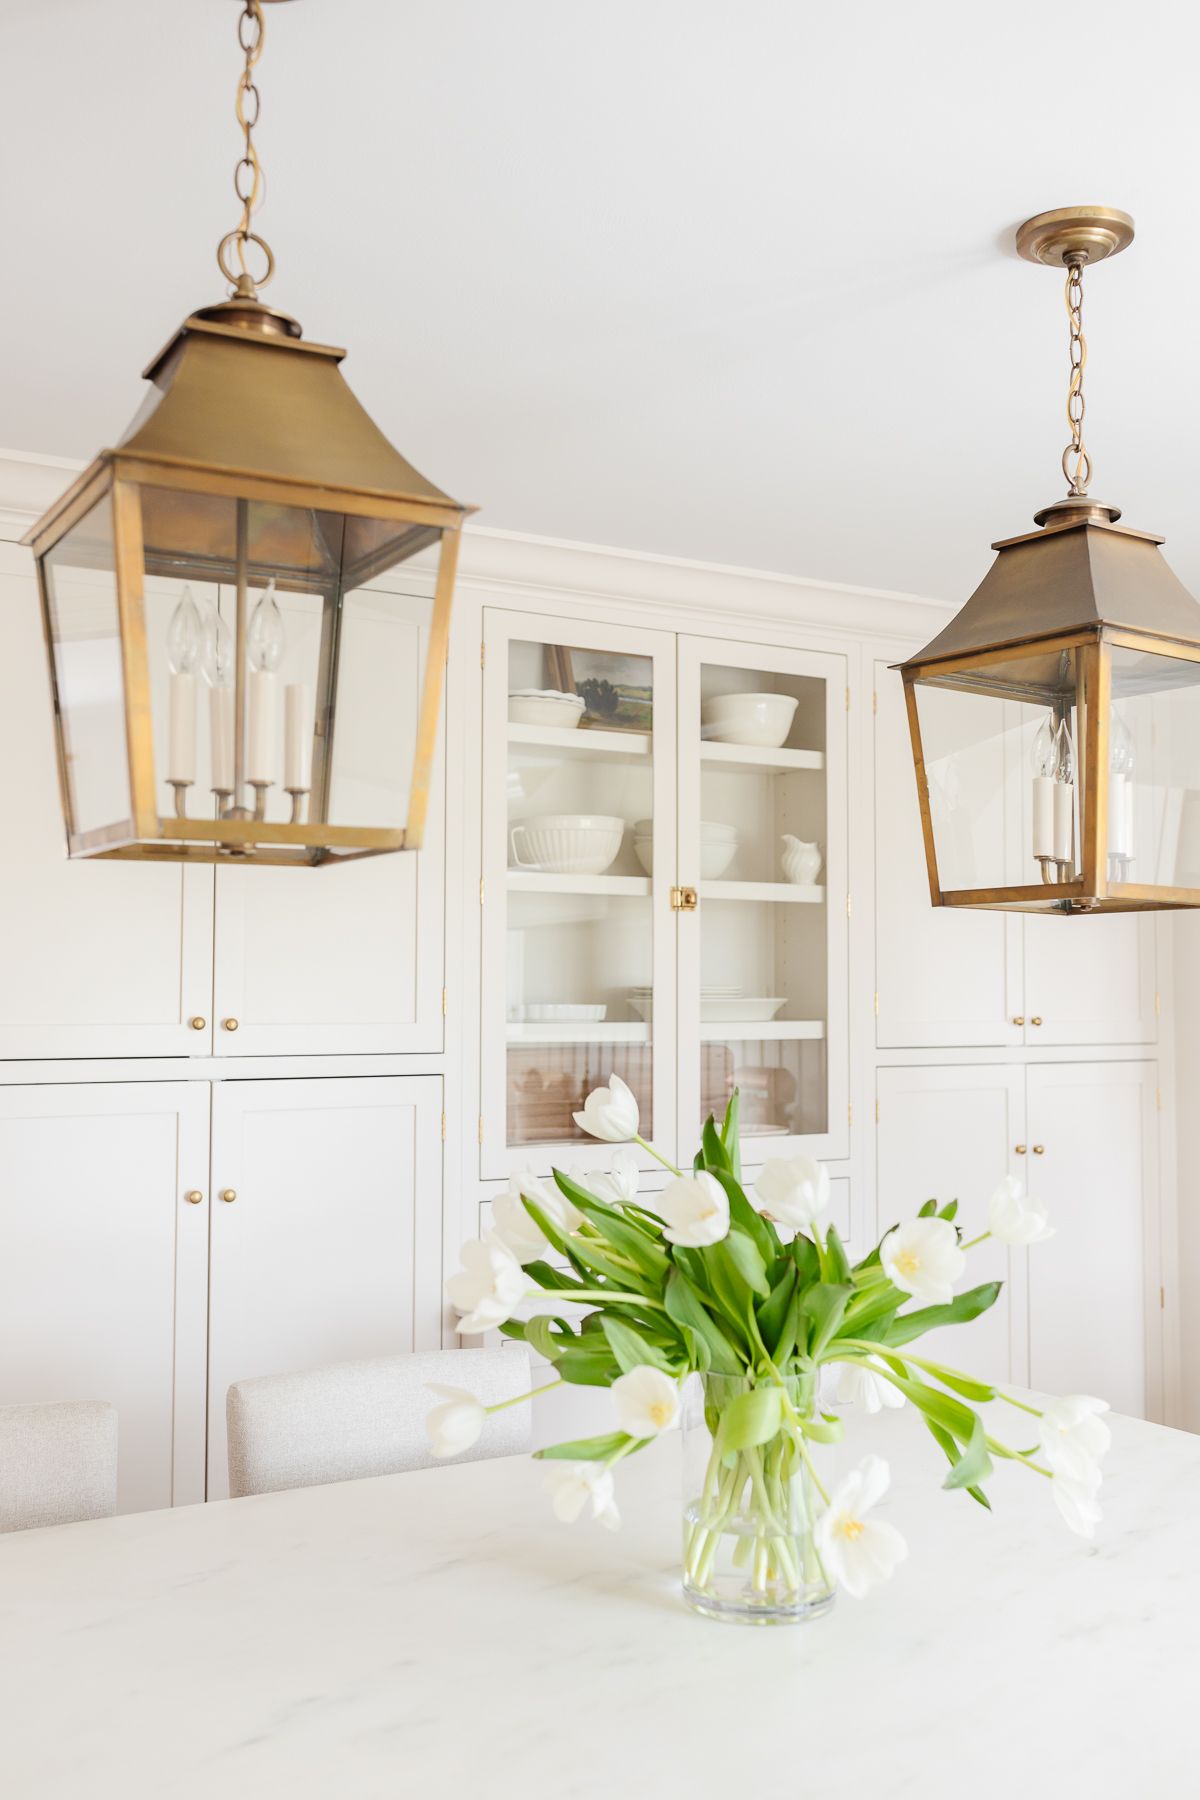
Inset Cabinets
Kitchen & Dining
Inset Cabinets
No matter the era or style of your home, classic inset cabinets in your kitchen are an upgrade that will add character, function, and value. Get all the decision-making details to help you decide if inset cabinet doors are right for your kitchen! Read More
Our inset cabinets go to the ceiling not only to offer maximum space, but to also draw the eye to the ceiling, which gives the illusion of space. It’s accented with crown molding for another touch of timeless detail.
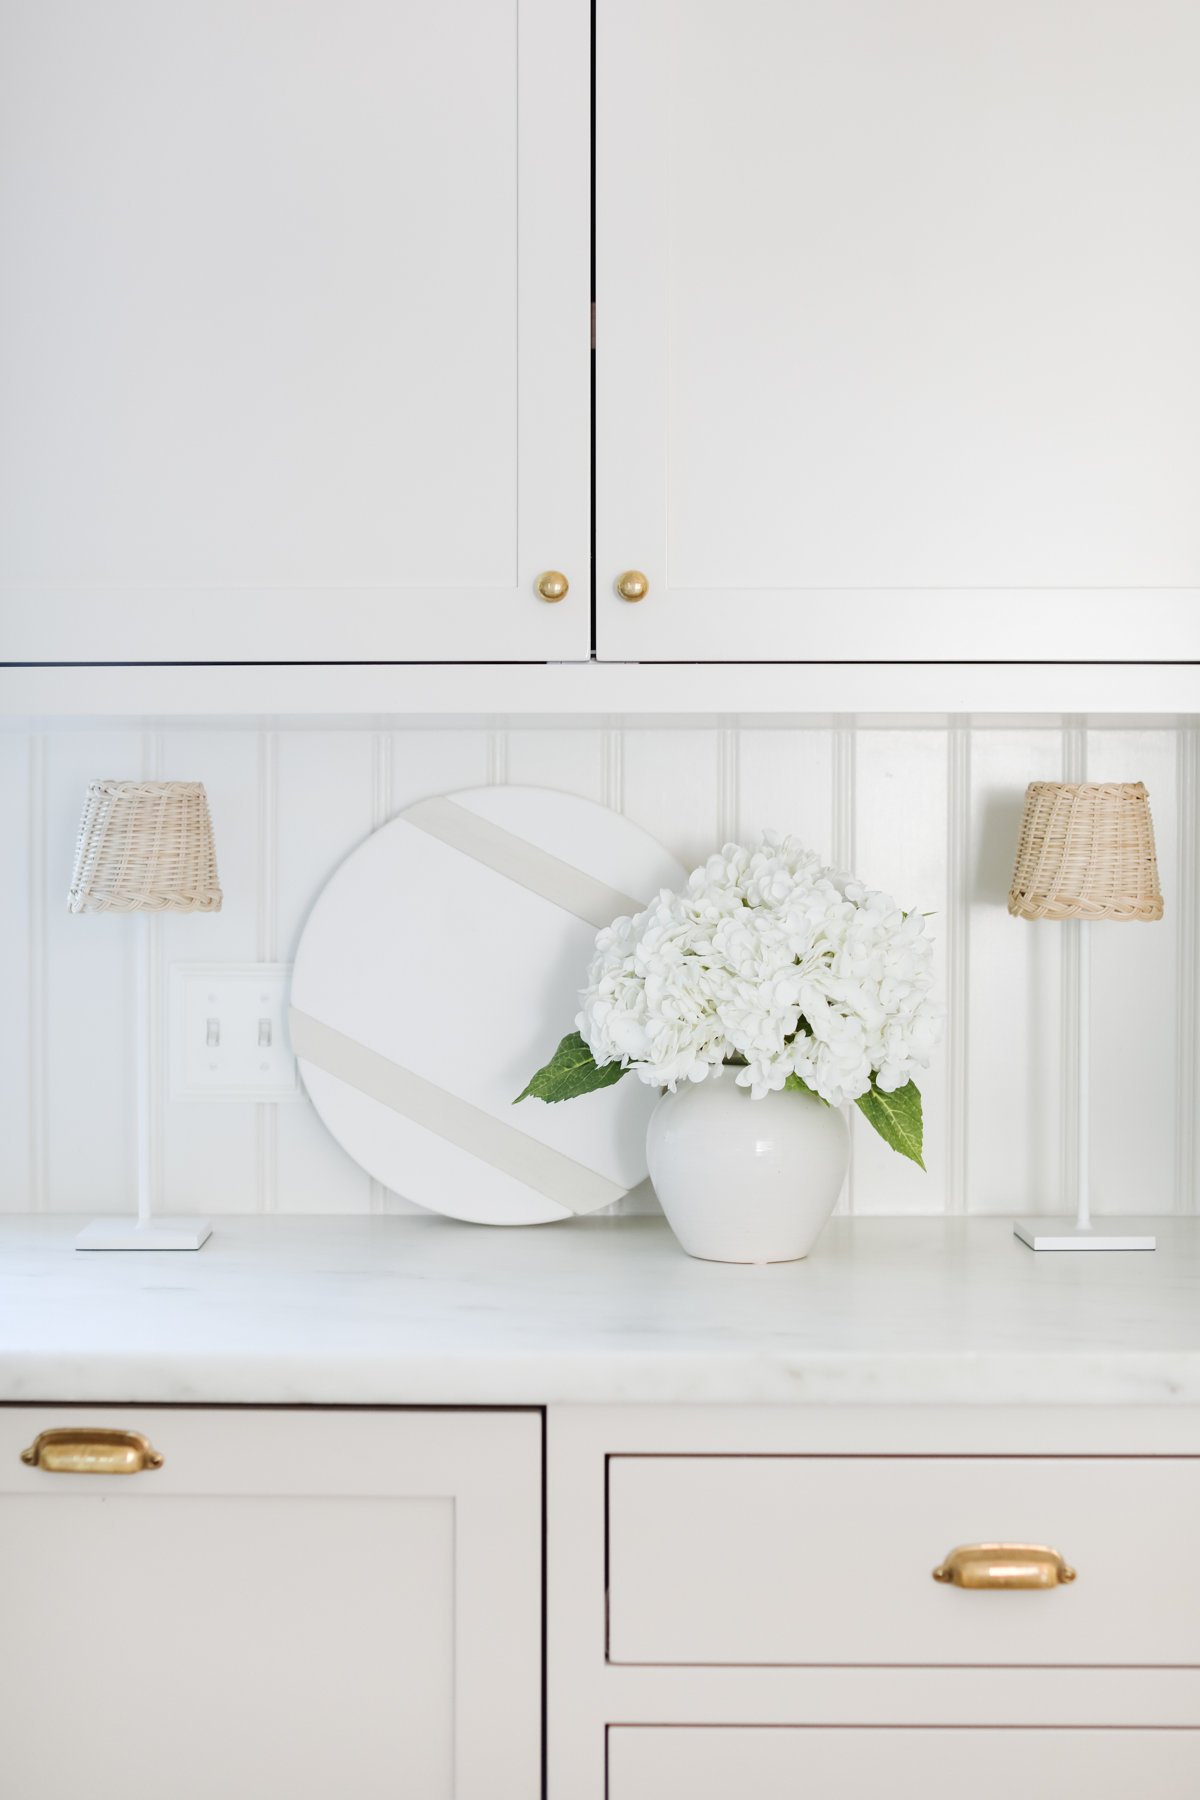
Cream Cabinet Color
Paint Colors, Tutorials & Tips
Cream Kitchen Cabinets
Cream kitchen cabinets are so popular, and with good reason – they are warmer than a true white and not as stark as gray. Cream colored kitchen cabinets are the prettiest way to create a warm and inviting kitchen! Read More
After having white cabinets in our previous home, I wanted to warm it up a little, this time choosing a cream tone for our cabinets.
It still feels crisp and clean, yet cozy, warm and inviting. Using a light paint color with a subtle sheen reflects light and makes the space feel larger and brighter.
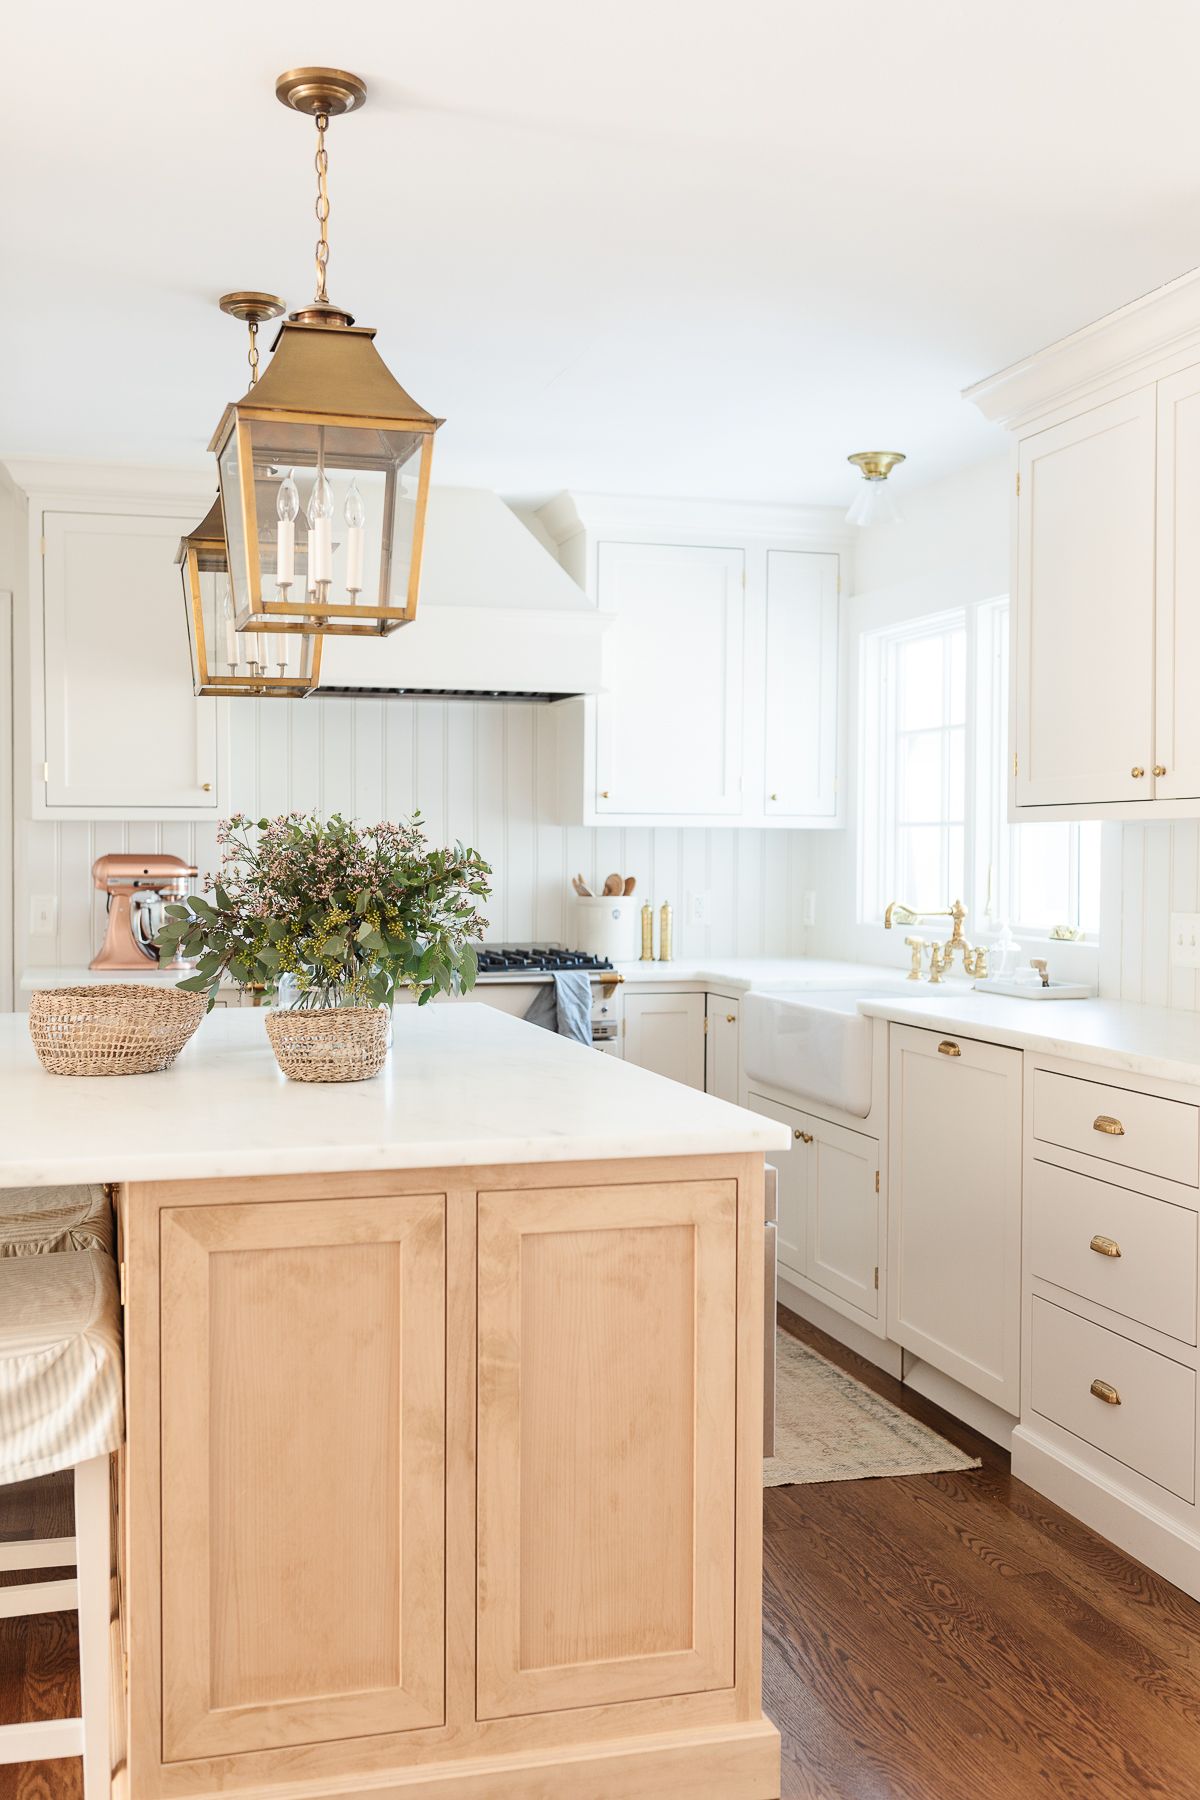
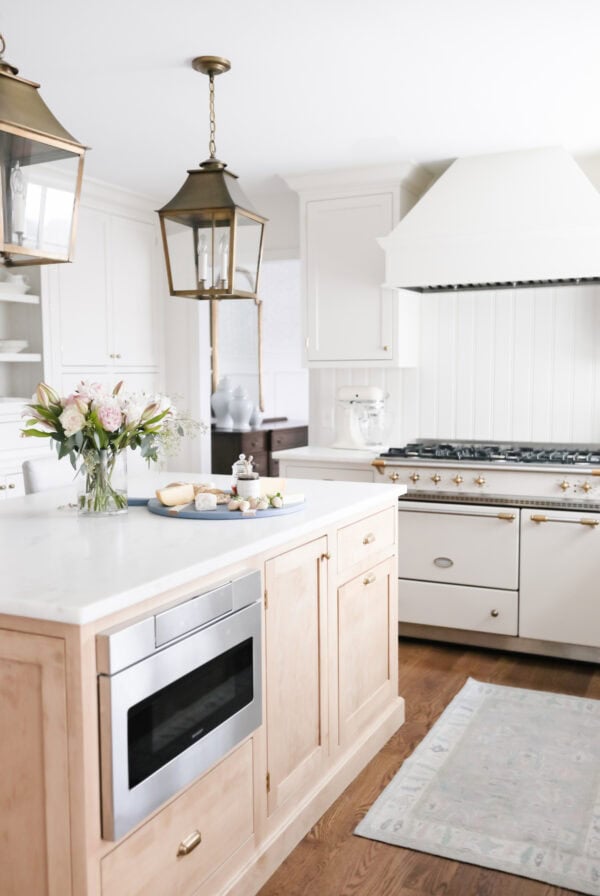
Kitchen Island
Design Guides, Decor & Tips
Kitchen Island Dimension Guidelines
If you’re designing a new kitchen, you might be hoping to incorporate a kitchen island for an expansive workspace and extra seating. To see if it fits in your floorplan, check out this guide to help you choose your kitchen island dimensions. Read More
We paired the island with Ikea Counter Stools I painted cream and had slipcovered. Learn more about Bar Stools for Kitchen Islands here!
To balance an all cream kitchen, we had the island made in wood. It offers a nice variation and disguises footprints from little legs kicking the cabinets. It’s protected with Modern Masters Dead Flat.
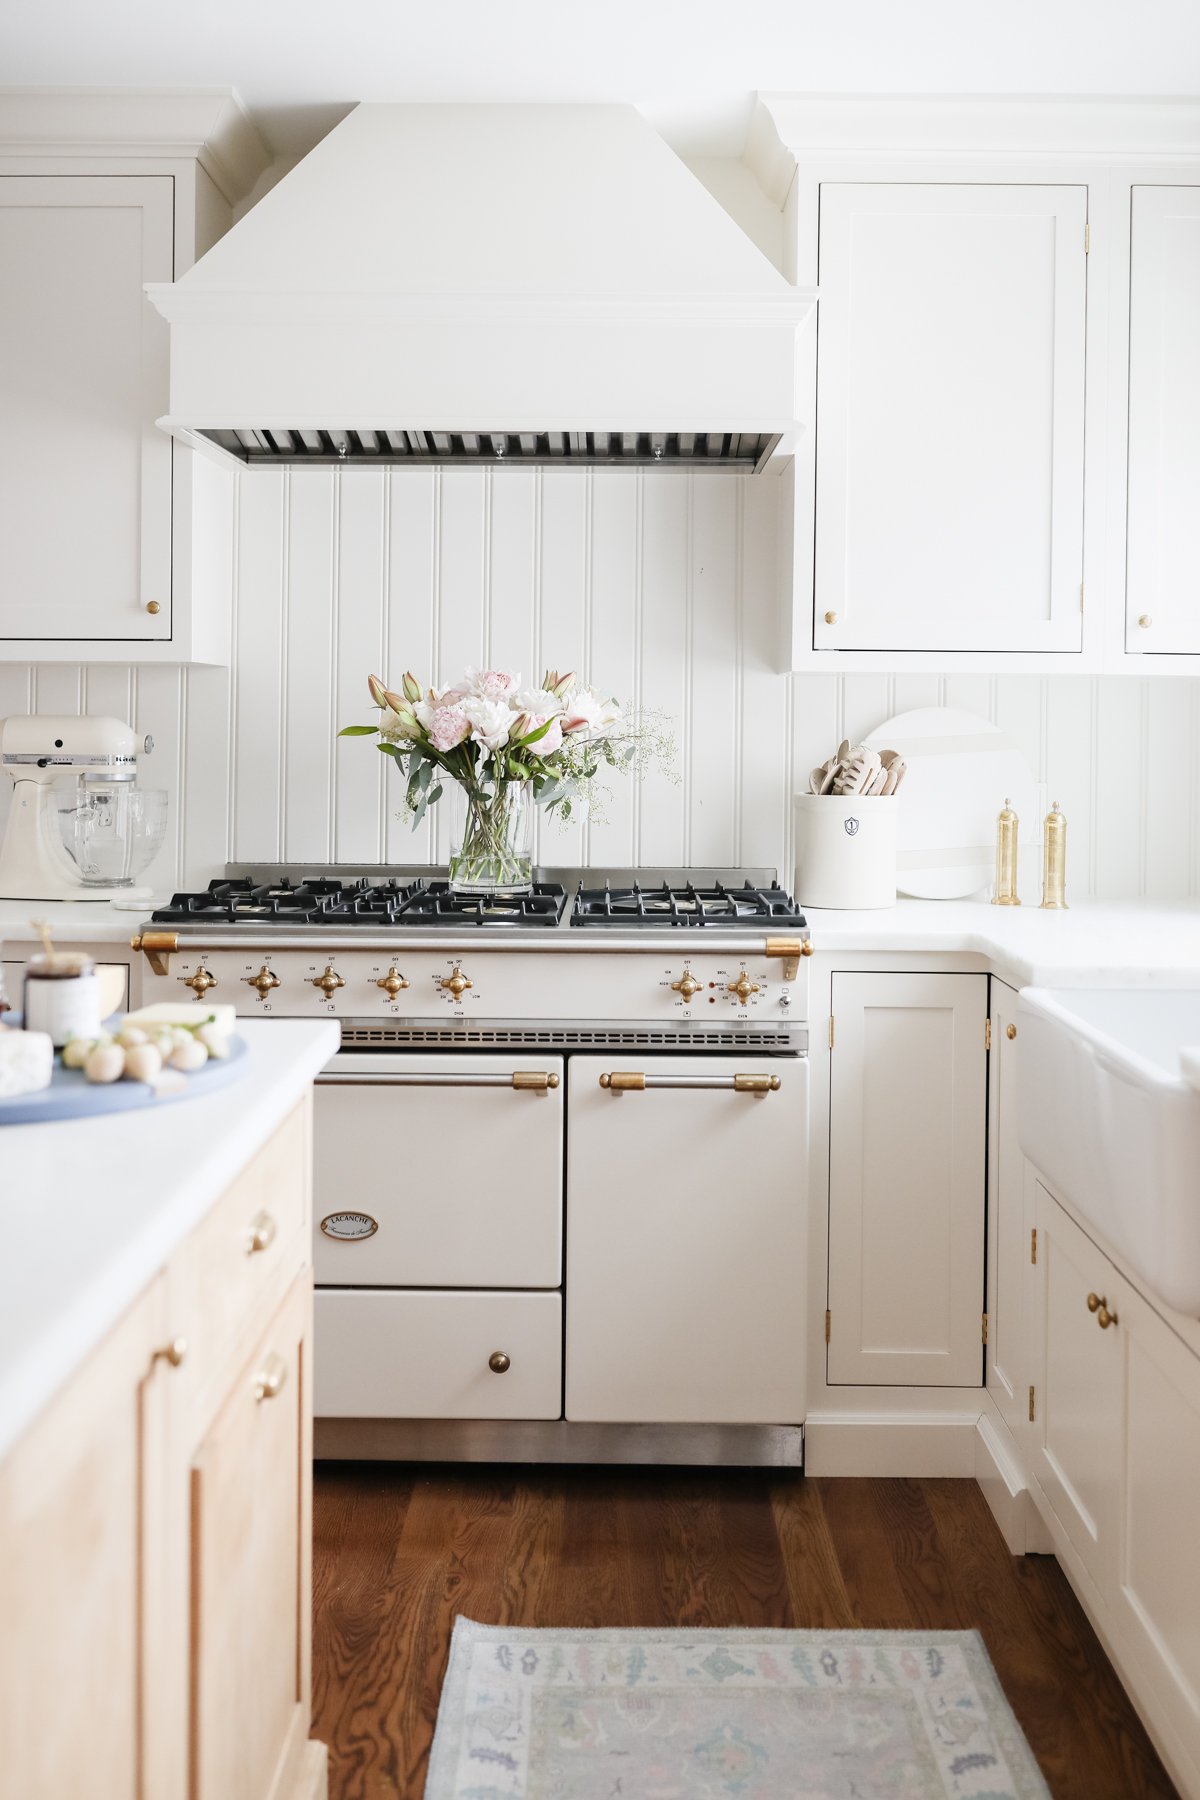
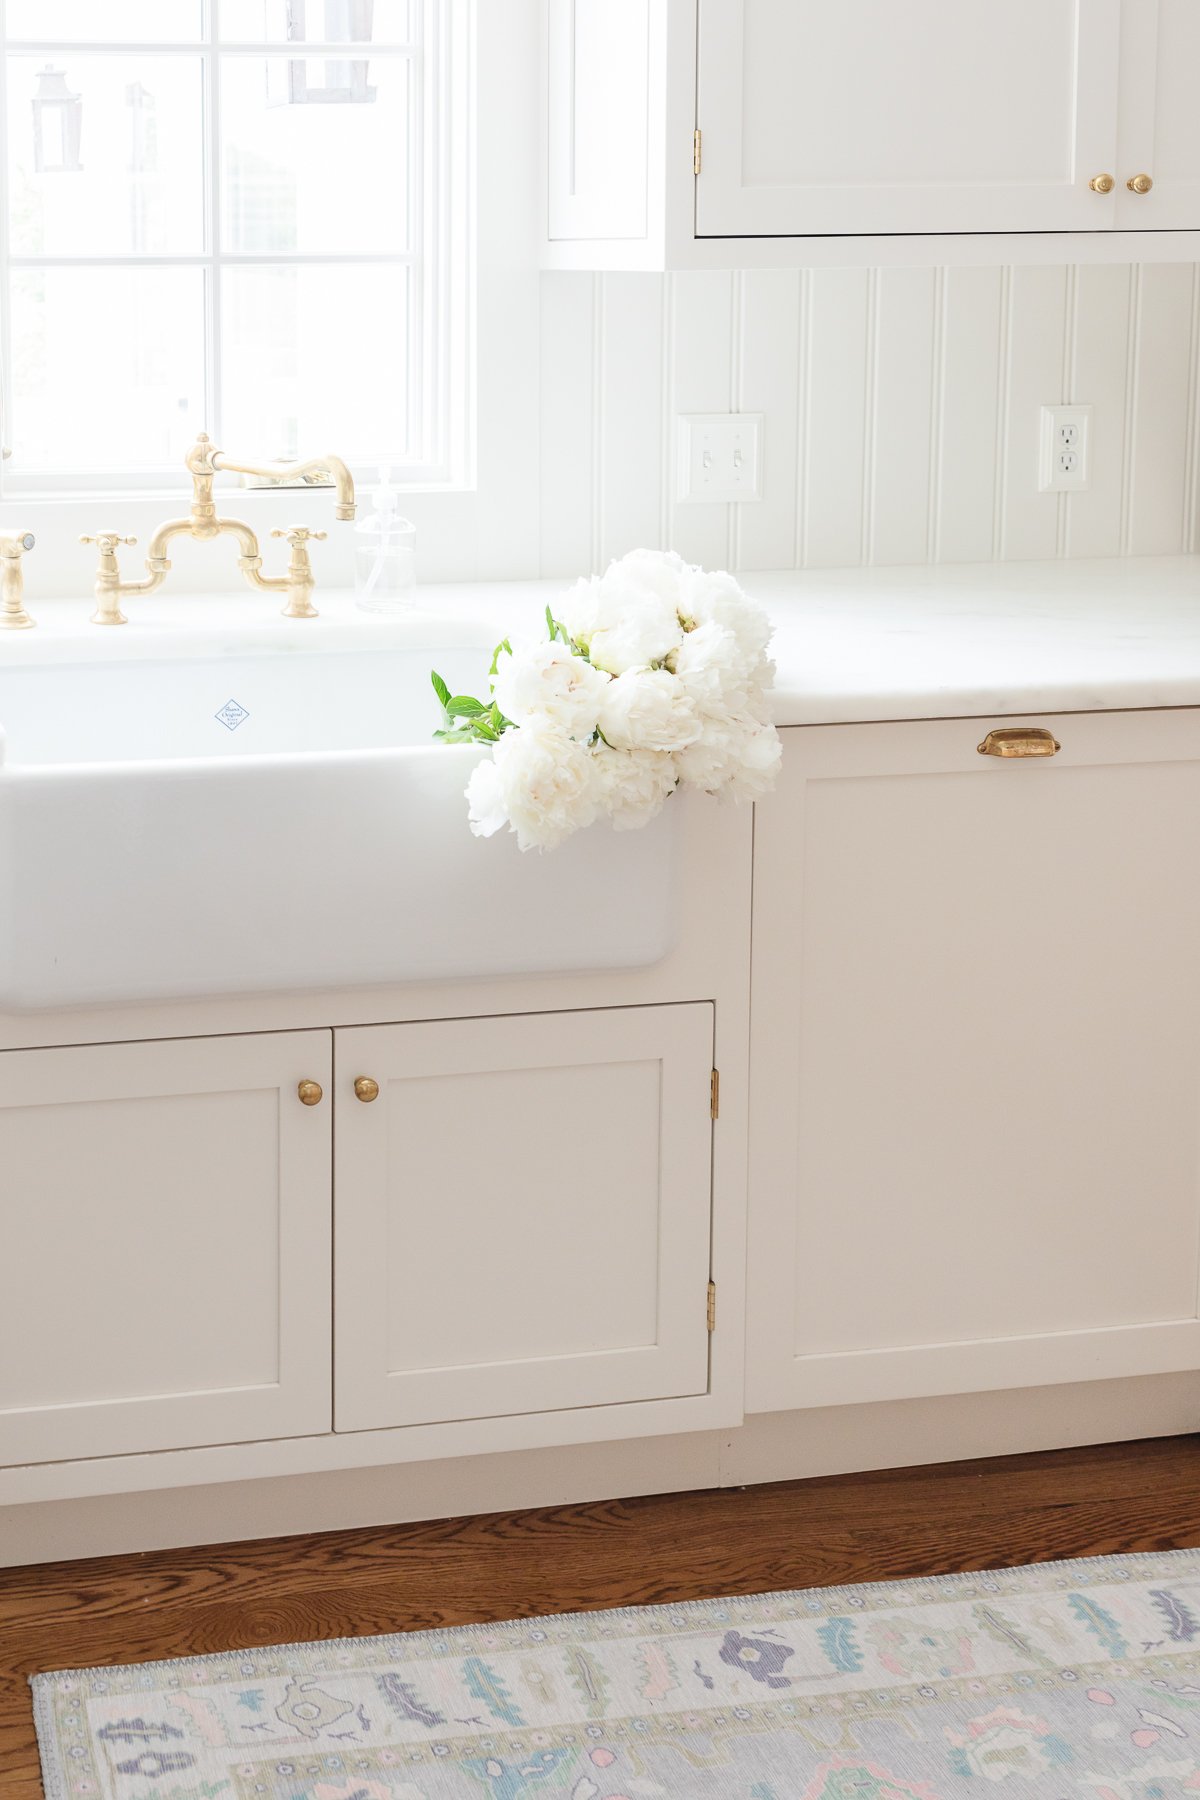
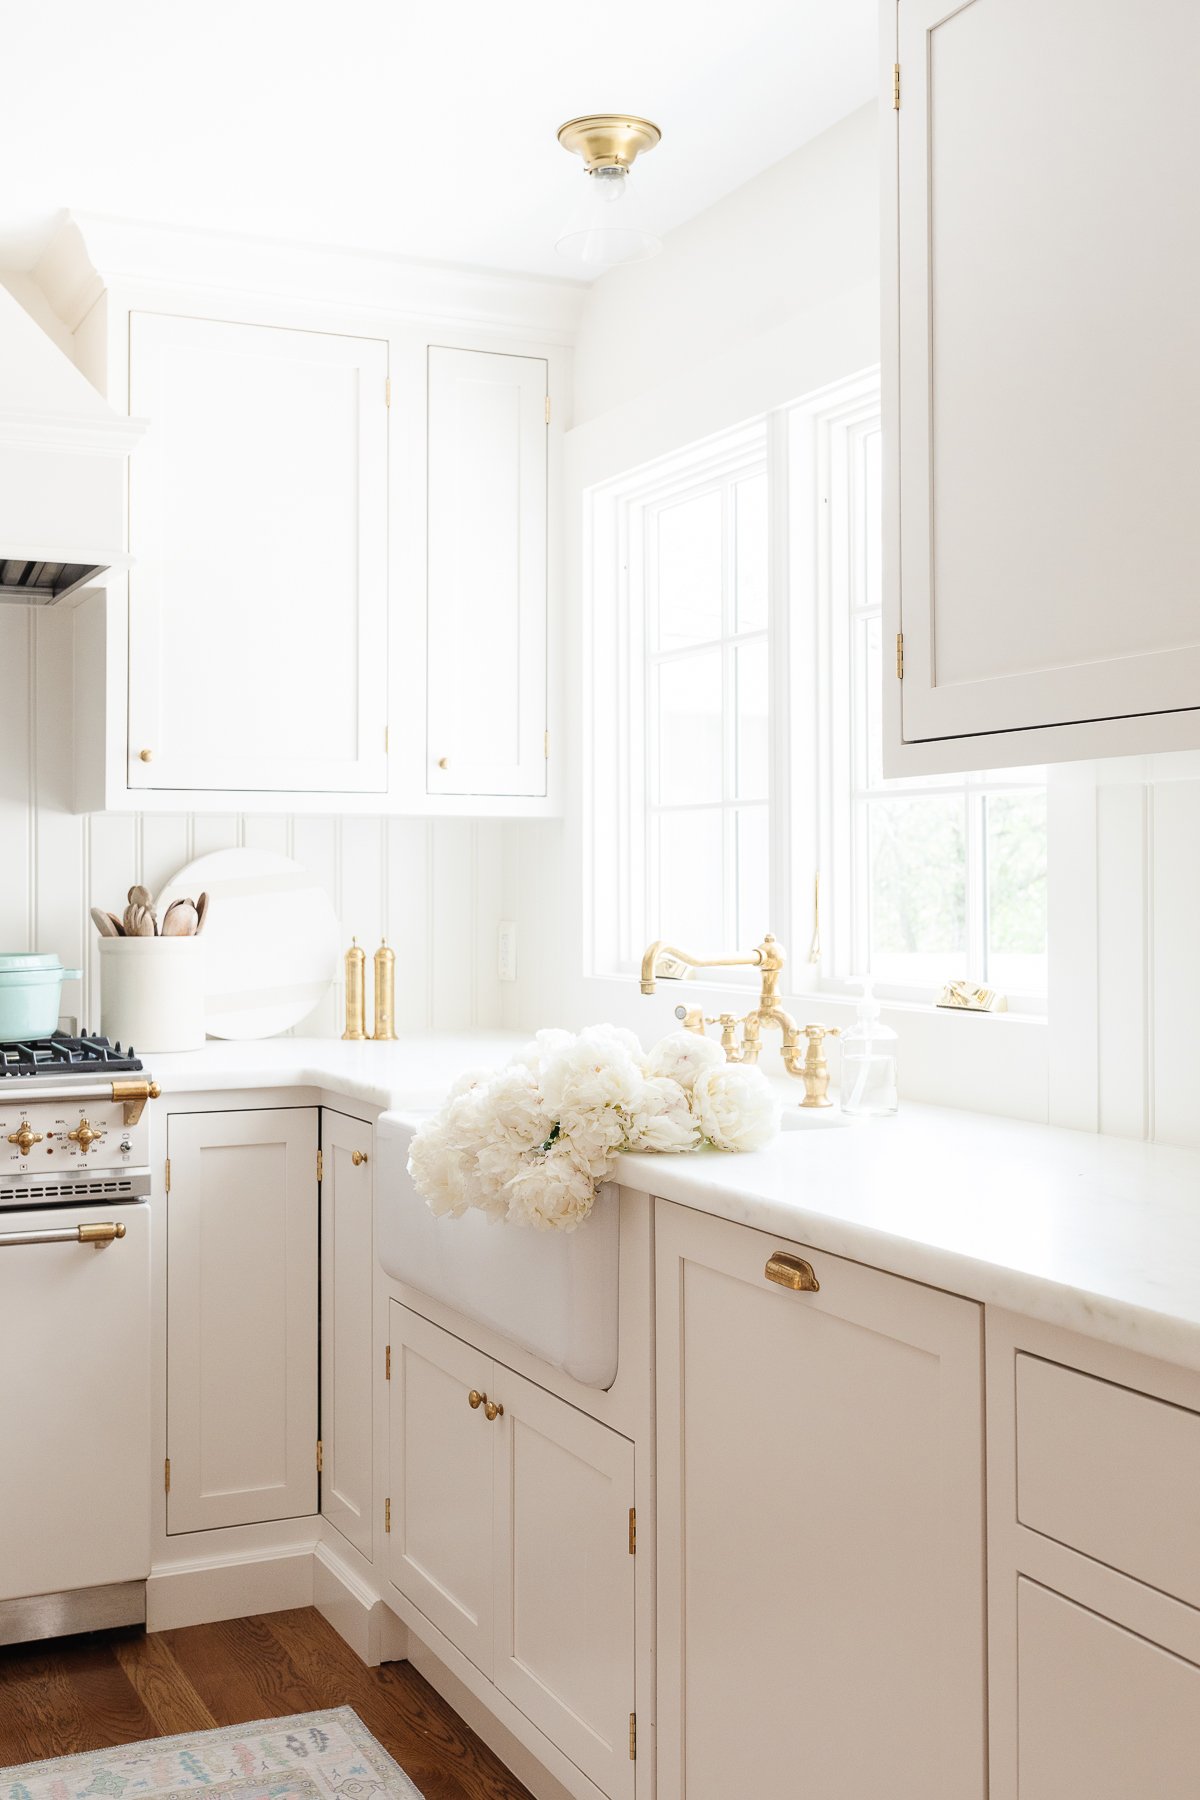
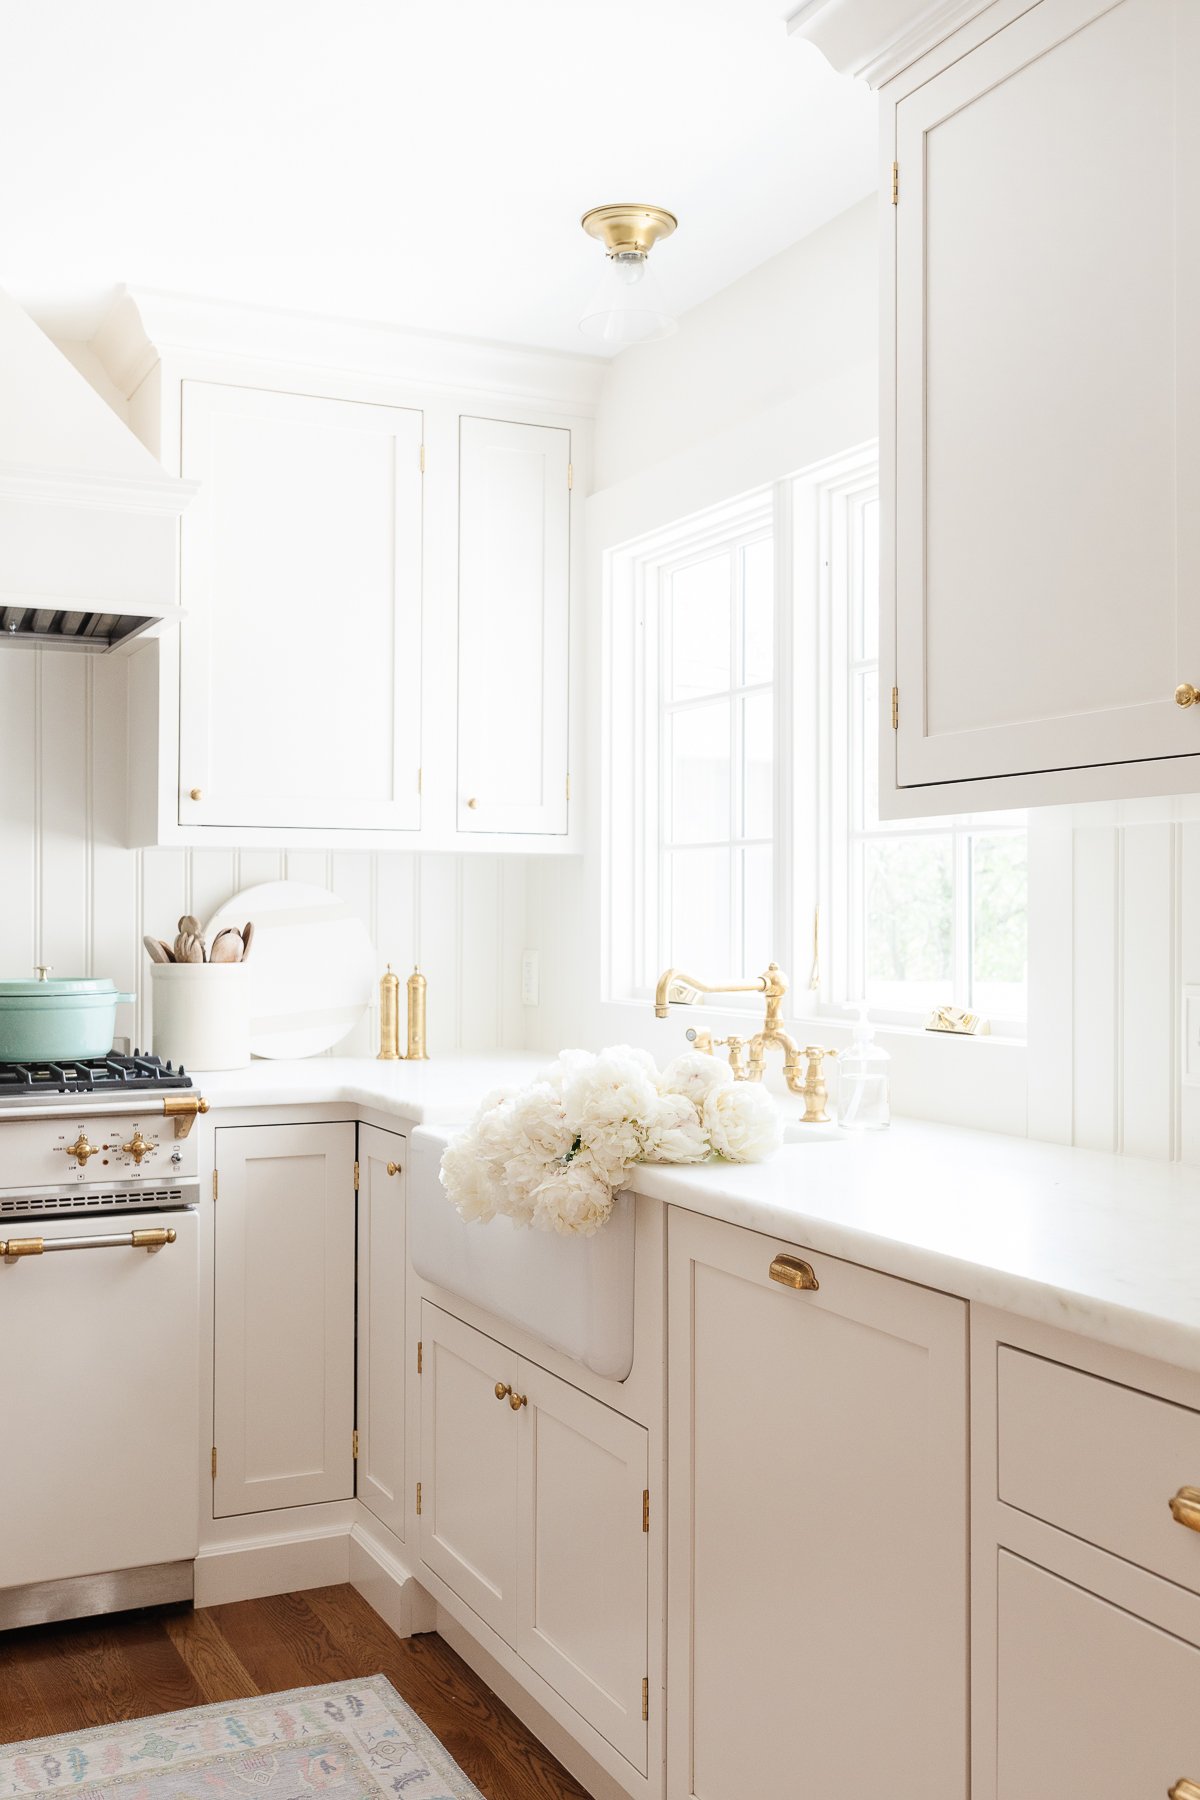
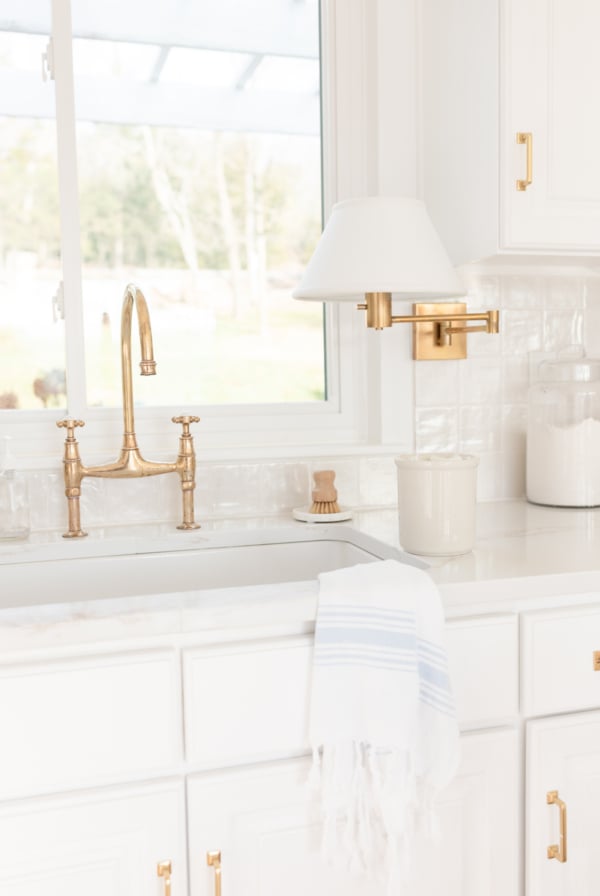
Unlacquered Brass Hardware
Kitchen & Dining
Unlacquered Brass Hardware
Unlacquered Brass is polished, unfinished raw brass that darkens and develops patina as it ages. Keep reading to learn more about it along with the knobs, pulls, hinges and cabinet latches. Read More
The shaker kitchen cabinets are hung with exposed hinges. I love the little detail they offer. While most modern cabinet doors are hung with concealed hinges, these offer classic kitchen style.
To add a little interest, three styles of hardware were used to accent the cabinets including knobs, pulls and latches, all in unlacquered brass. Read more about our appliance pulls and cabinet latches here.
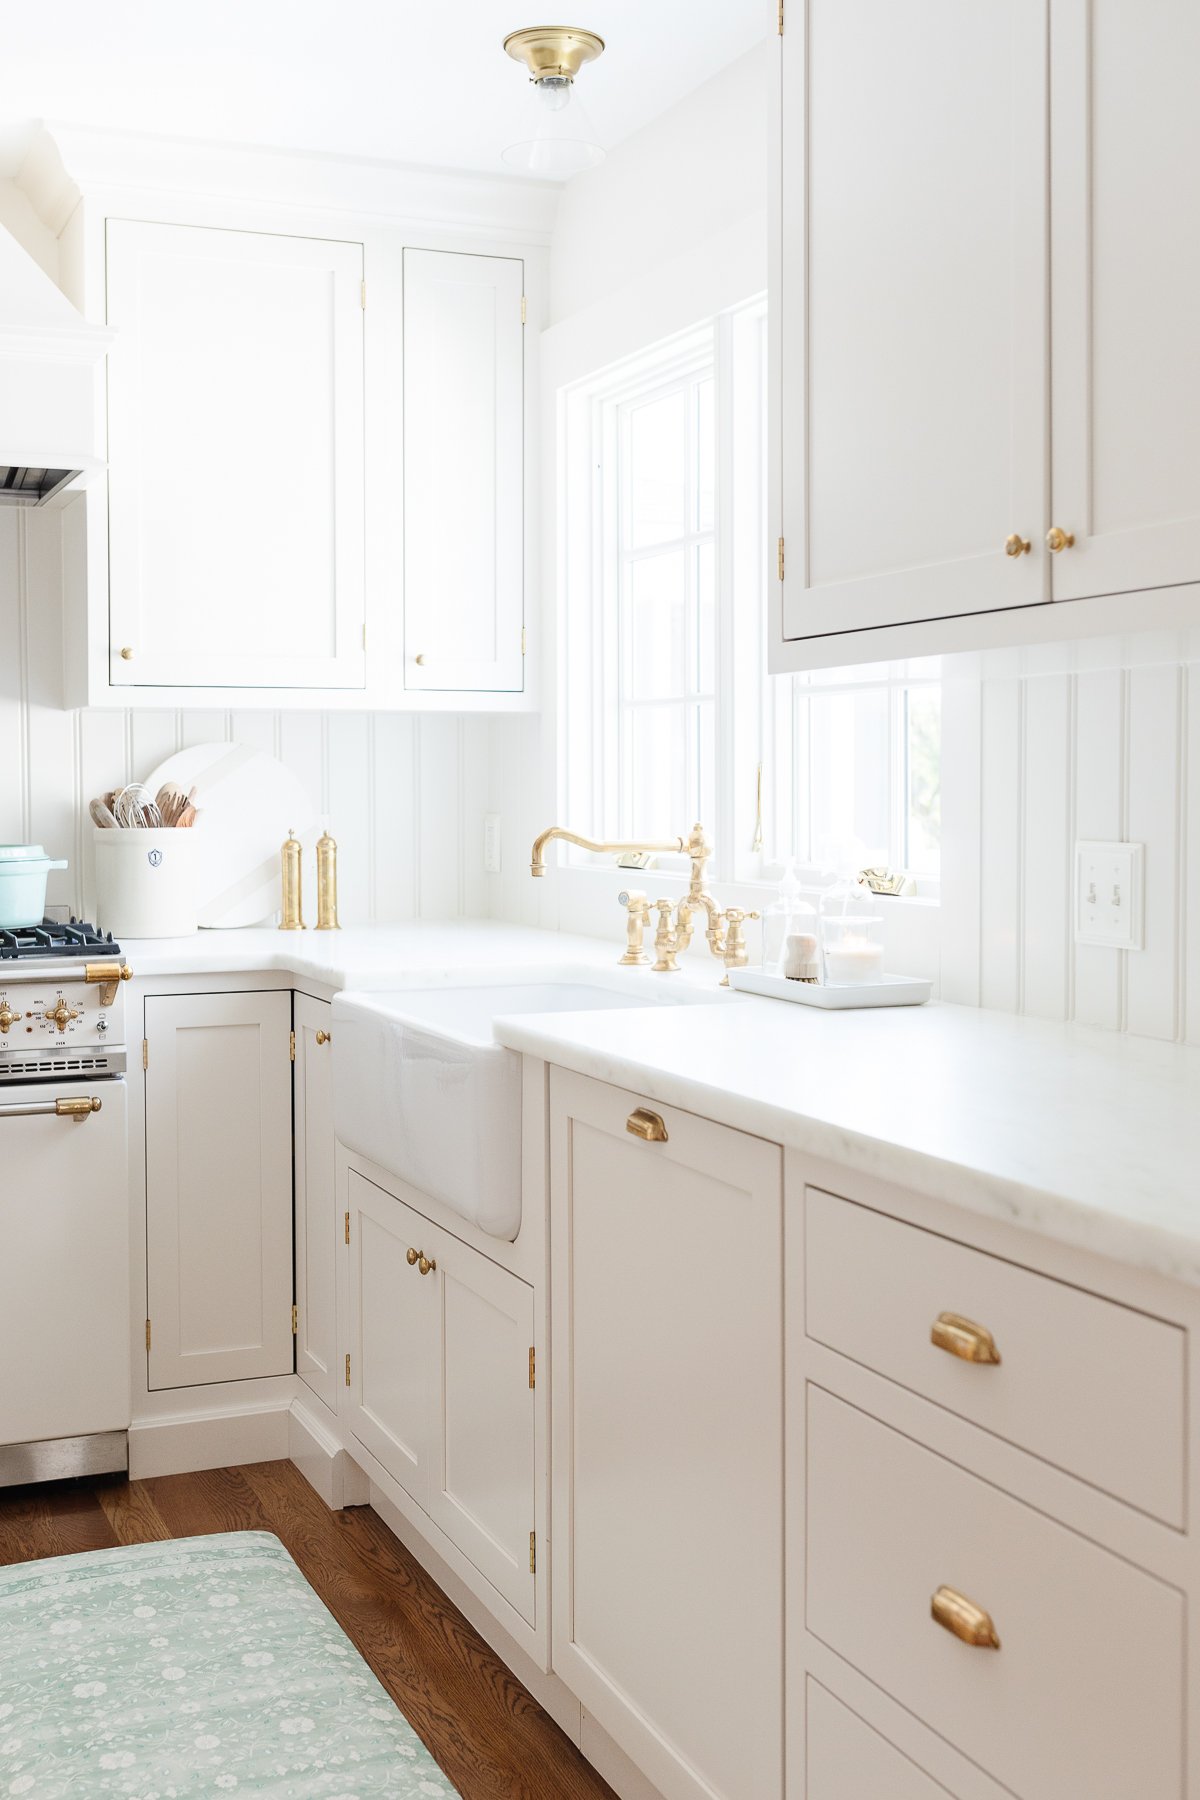
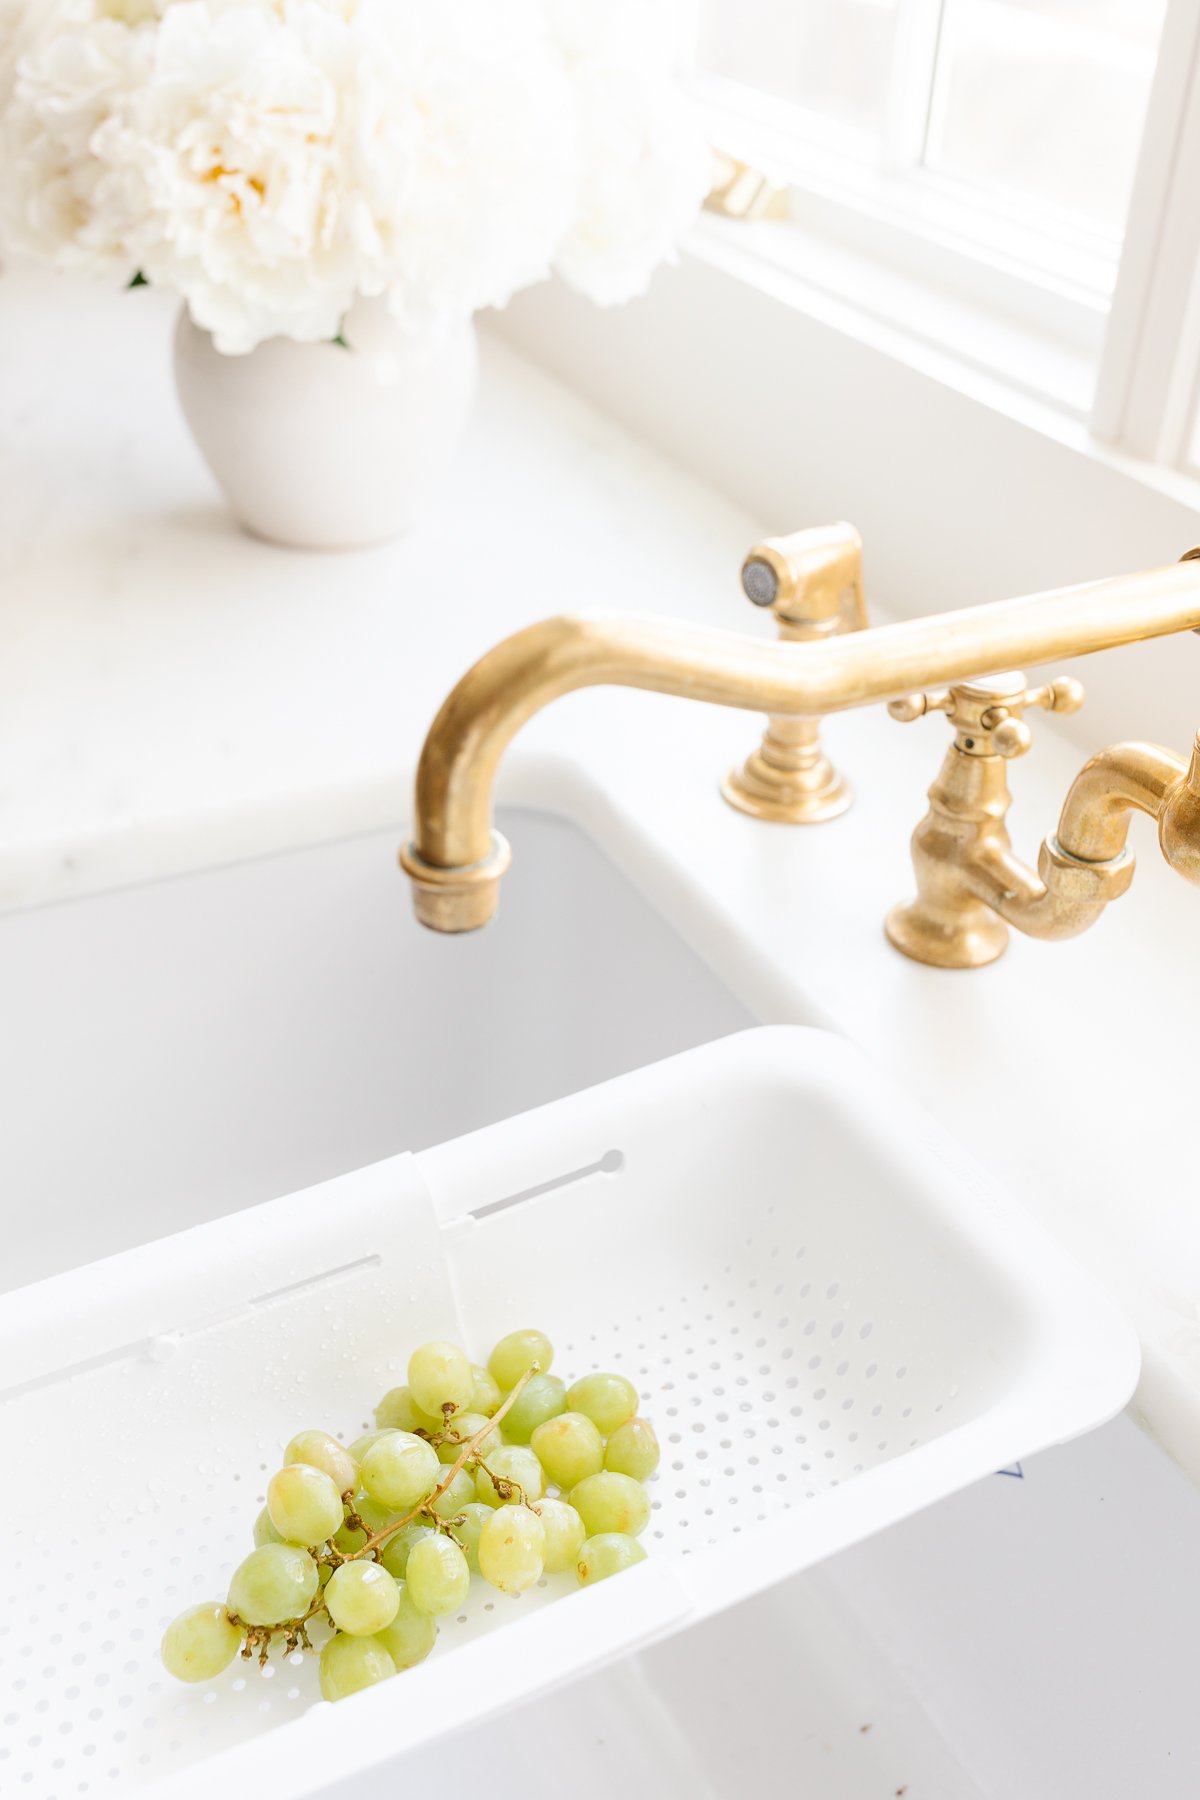
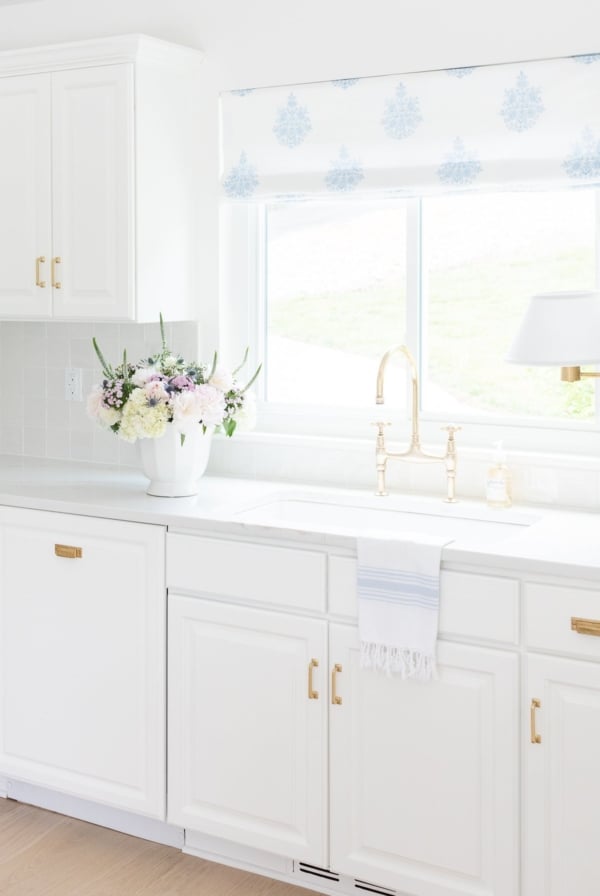
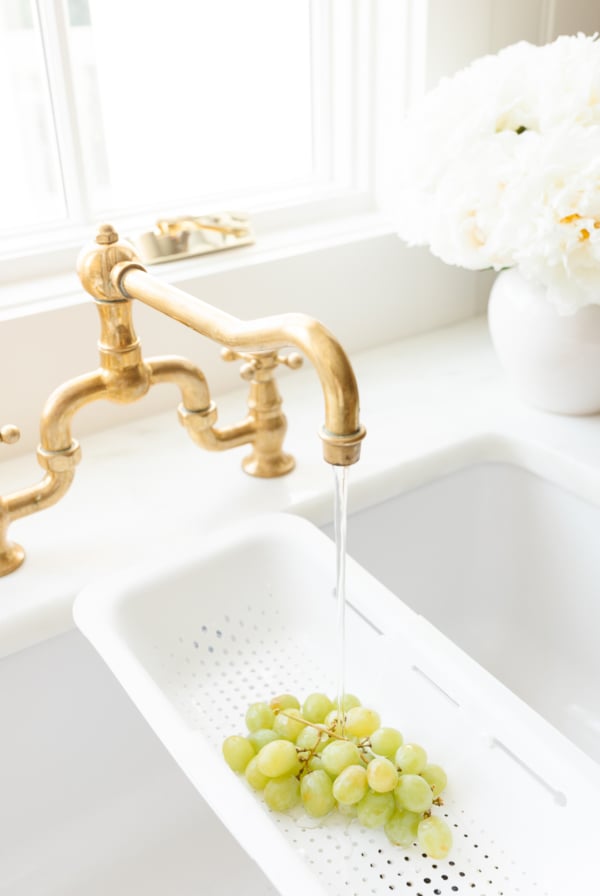
Unlacquered Brass Faucets
Design Guides, Decor & Tips
Unlacquered Brass Faucets
Get the details on purchasing an unlacquered brass kitchen faucet (also known as uncoated brass, a living finish or raw brass). You’ll learn where to shop, what to look for, and what to expect as it ages! Read More
While they can be polished to a bright, shiny brass, they now have a beautiful patina which adds to a classic kitchen design.
Farmhouse Sink
Kitchen & Dining
Farmhouse Sink
All the details about a classic porcelain fireclay apron front farmhouse sink, including the pros, cons and installation of this classic white kitchen sink. Read More
Designing your dream kitchen on a budget requires a balance of splurges and compromise. One thing I didn’t want to compromise on was the farmhouse sink. It’s one of the prettiest, most functional elements that help achieve the feel of a classic kitchen.
It’s thick, making it feel substantial and there’s so much beauty in the handmade imperfections of this sink. The little blue emblem adds a touch of country inspired charm and detail.
Danby Marble Countertops
Kitchen & Dining
Danby Marble
Learn everything you need to know about Danby Marble in this comprehensive guide. Learn about cleaning, sealing, pricing + MORE. Read More
We chose a Danby marble for our classic kitchen. The subtle veining pairs well with cream cabinets. There are so many options that work well for a classic kitchen, but for me, nothing is more timeless than marble.
Marble is an authentic stone that wears and patinas with time, adding to the character and beauty. It’s truly timeless because it’s been used for centuries!
Once the marble is sealed properly, there is little to no staining. Etching does occur with acidic juices, but is minimized by using Comet. They’re protected with StoneTech BulletProof Sealer and easily cleaned with this homemade marble cleaner.
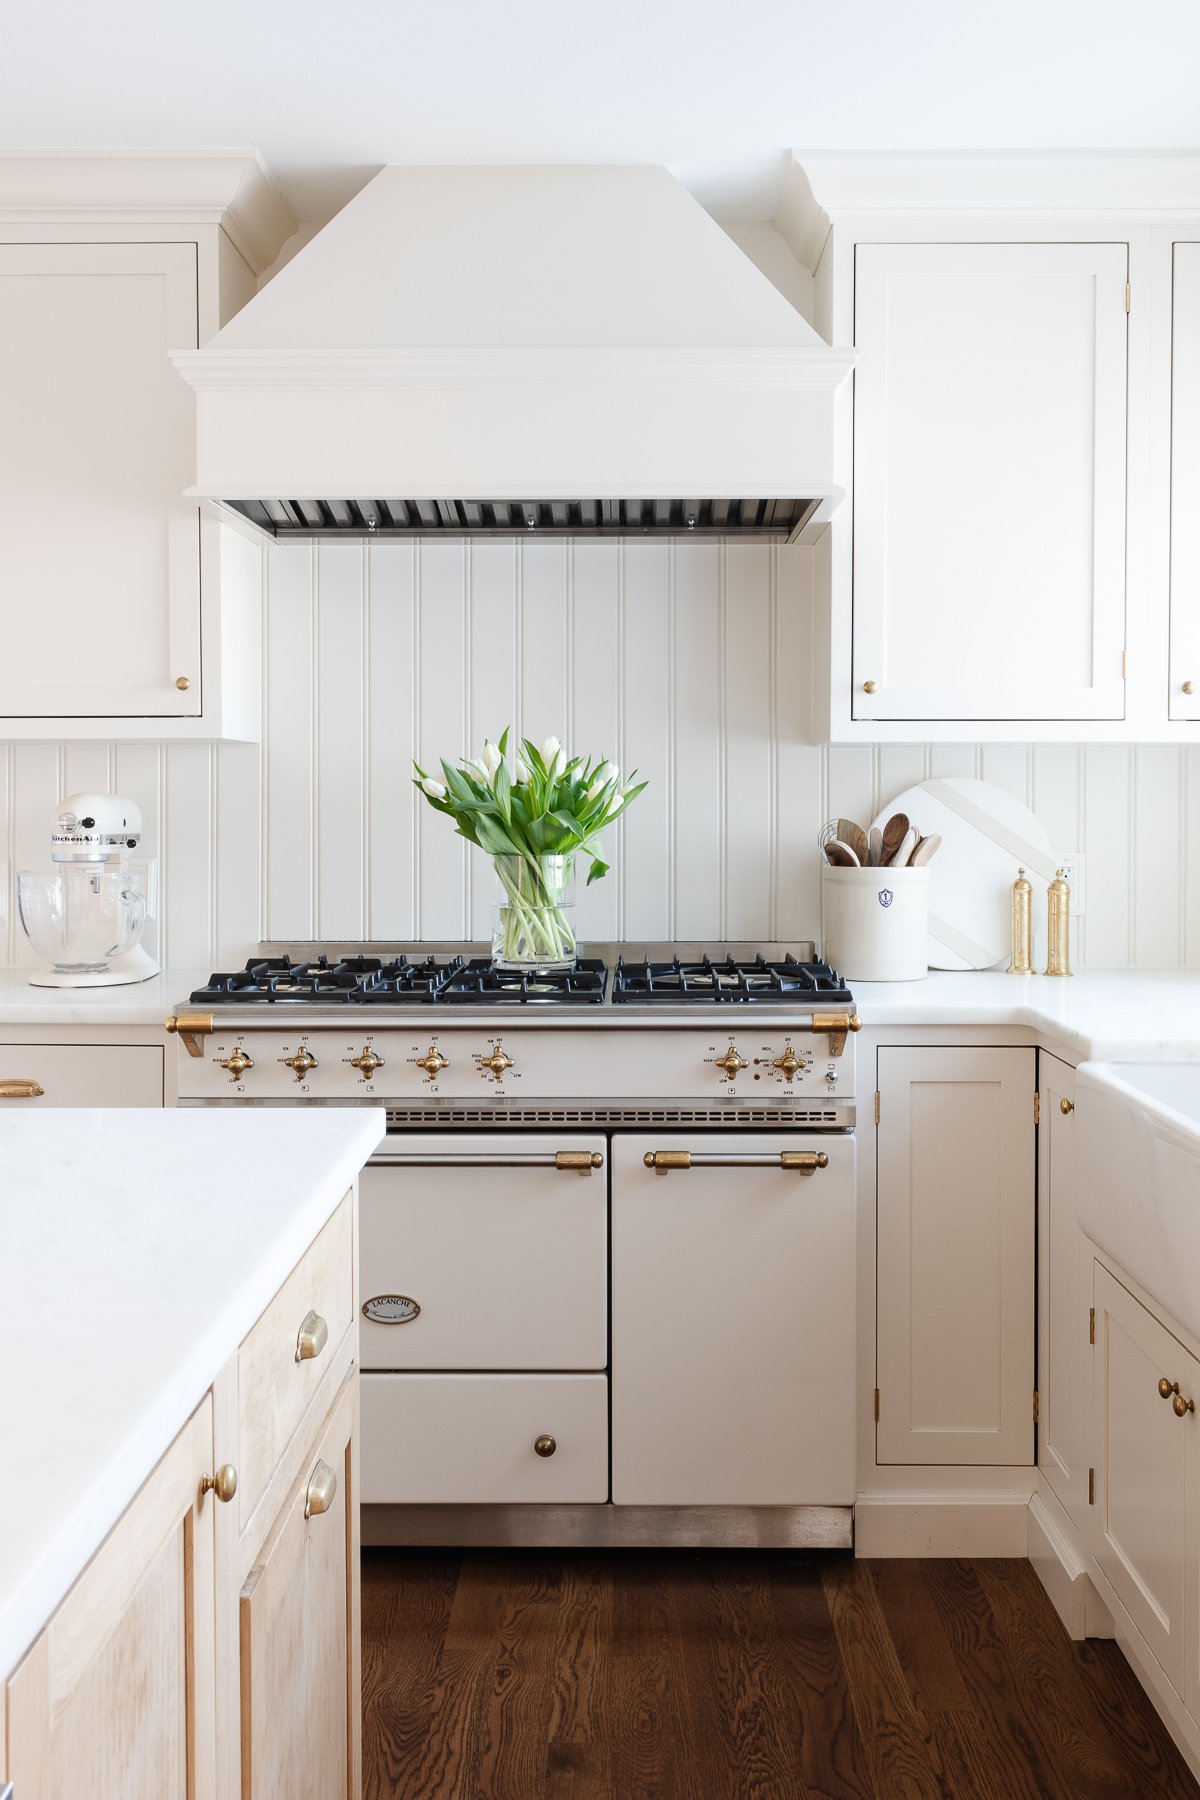
Beadboard Backsplash
Design Guides, Decor & Tips
Beadboard Backsplash
Get all the details about beadboard backsplash for your kitchen. After we installed this pretty beadboard in our kitchen, we received many questions – so this guide is the answer! Read More
Beadboard backsplash blends traditional elegance with the classic comfort of an English country style kitchen. It’s classic, timeless, and understated. It’s also inexpensive and easy to wipe clean (when properly painted).
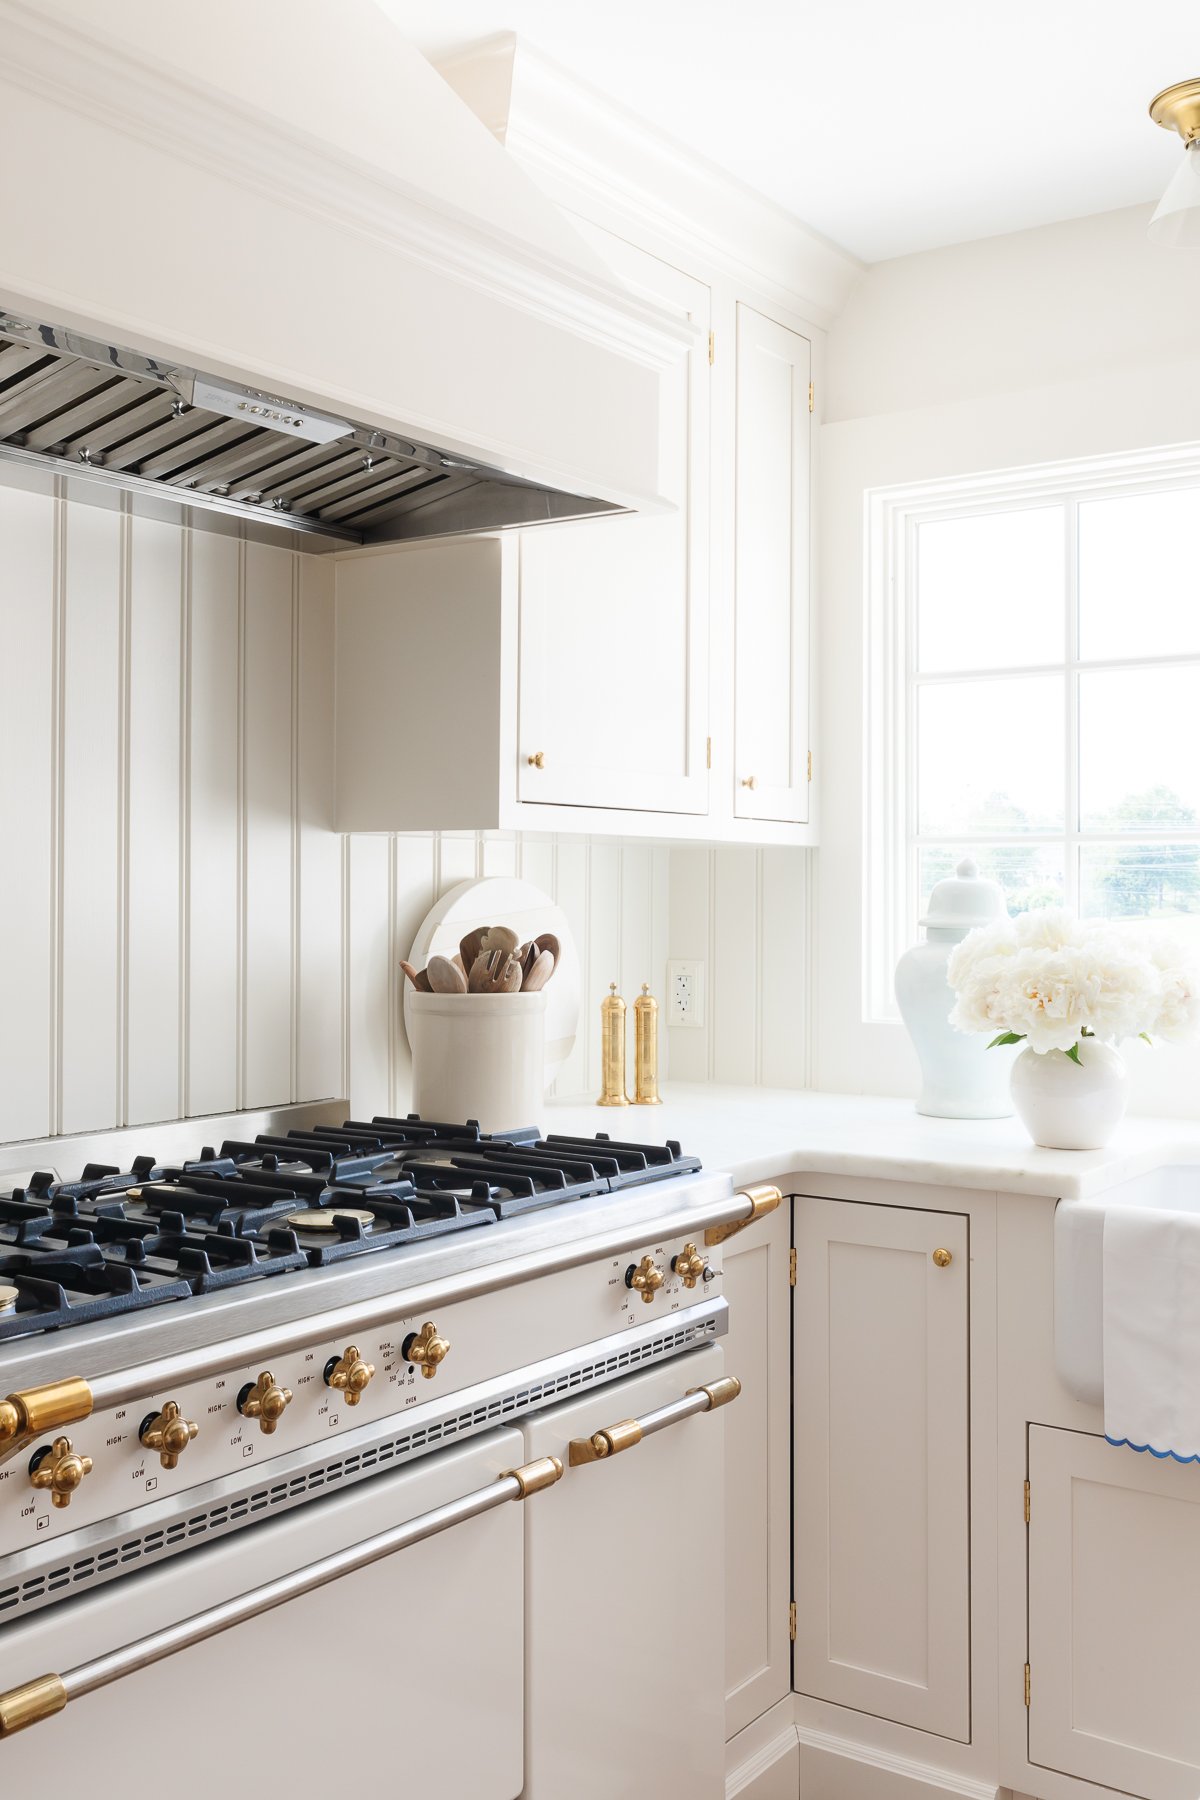
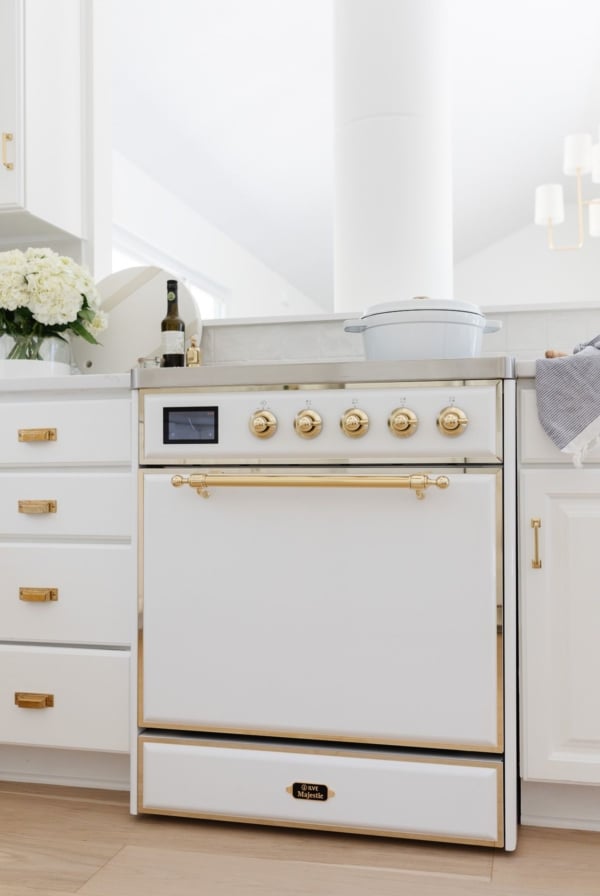
Lacanche Range

Kitchen & Dining
Lacanche Range
If you’re shopping for a timeless French stove, you’ve come to the right place! This is a review of our Lacanche French range, including lots of photos, details and insight into this brand and others. Read More
Our Lacanche range was a significant investment, but offered a lot of versatility for my business. With eight racks on the electric / convection oven and two in the larger gas oven, multiple recipes or large quantities can be baked at once.
The french range is not only a workhorse, but also serves as the centerpiece of our kitchen.
Panel Ready Appliances
Kitchen & Dining
Panel Ready Appliances
Get the complete rundown on panel ready appliances for your upcoming build or remodel. They offer a beautiful, seamless look that will enhance any kitchen! Designing a kitchen can feel like a daunting task. There are so many decisions to make, and each one will affect the final look (and budget!) of your kitchen. Read More
In the new location, the refrigerator is seen from the living room, so we purchased an integrated refrigerator and had it designed to look like a french pantry.
We also purchased a dishwasher that could be integrated in the same way, and accented it with a brass pull so that it blends into the cabinetry, allowing the sink to shine.
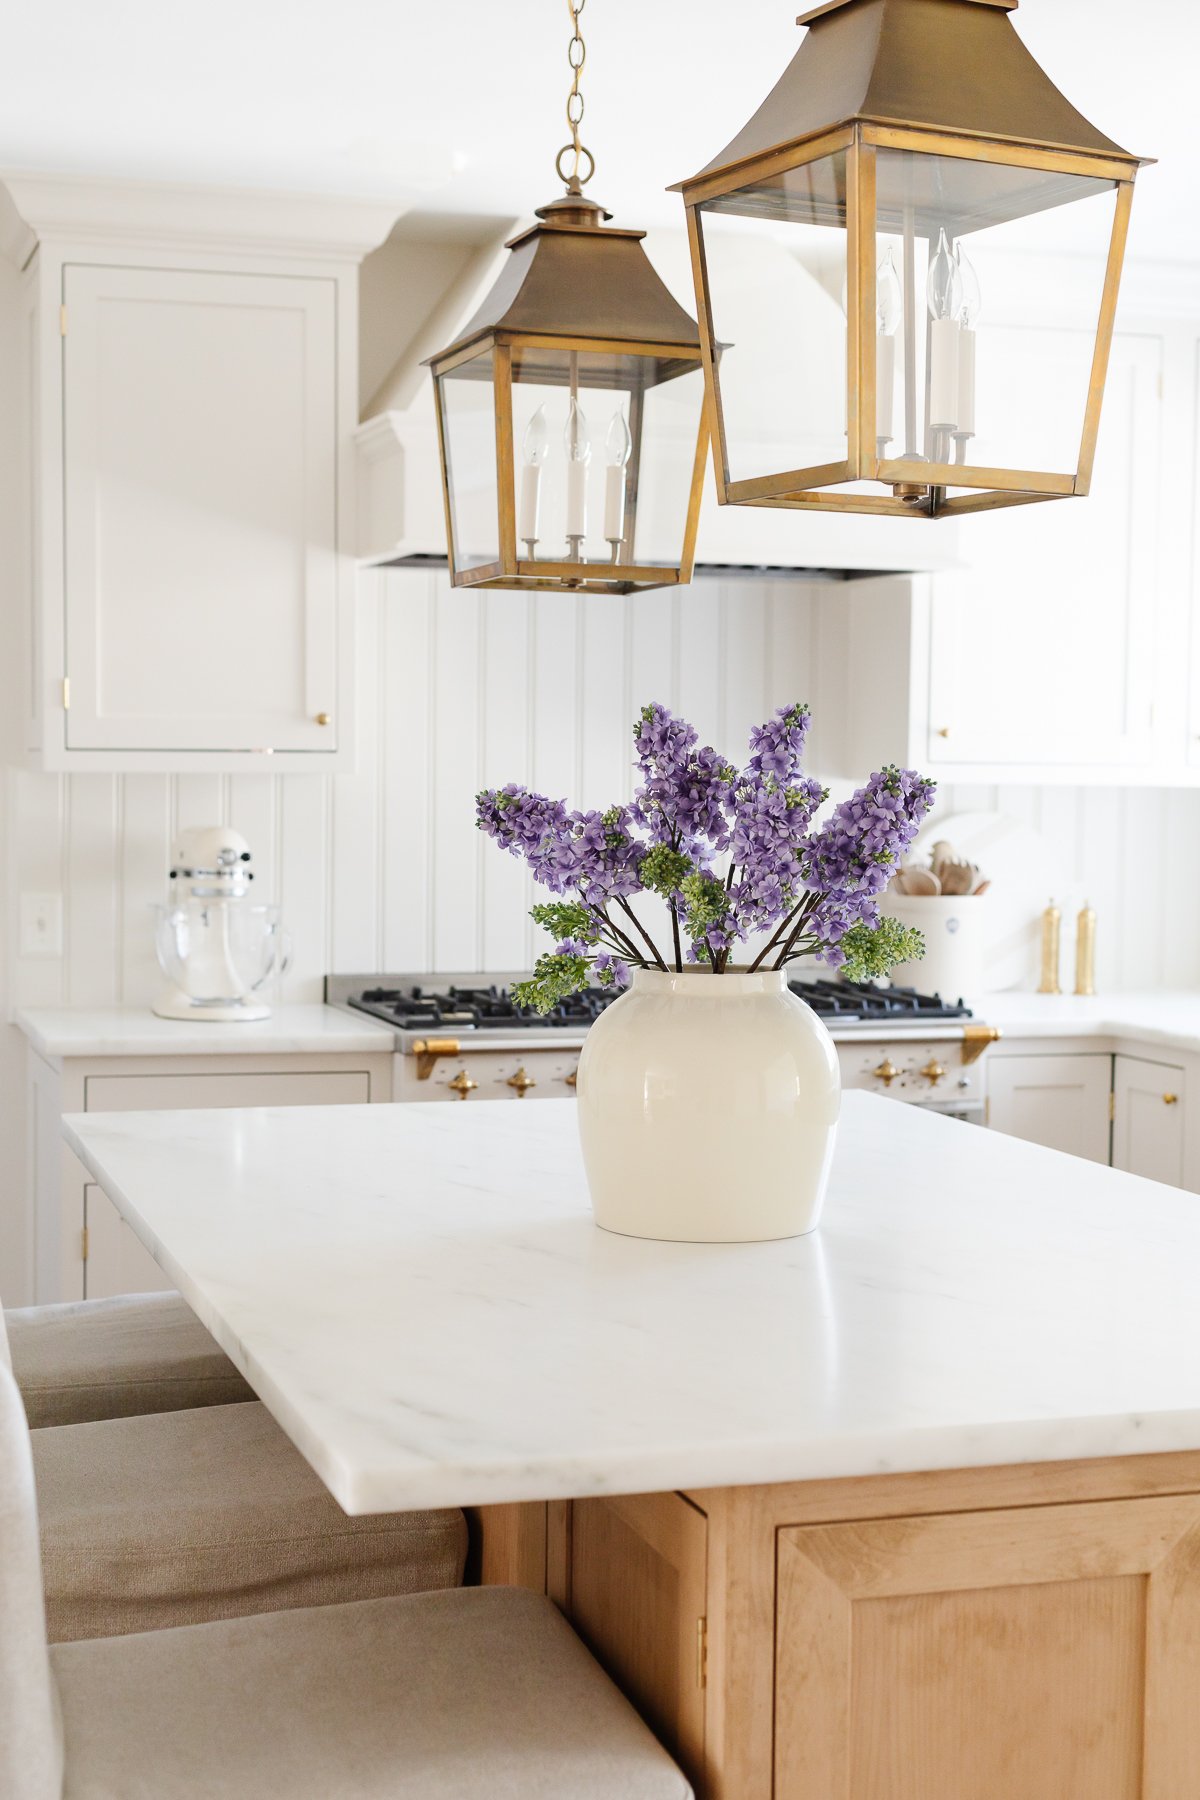
Brass Lantern Pendant Lights
Design Guides, Decor & Tips
Brass Lantern Pendant Lights
Get all the details about our brass lantern pendant lights! You’ll learn how to select island lights for your kitchen, and find our brass lantern pendants and more. Read More
Another traditional element you’ll find in our classic kitchen is brass lighting. We had two brass lantern island lights custom made that hang over the island to add an abundance of light in our previously dark kitchen.
Another brass flush mount is affixed over the sink. Both have aged gracefully over time and help break up the walls of cream cabinets.

Layout Notes
- We have a rectangular shaped kitchen that is also a pass through from the dining room, living room, breakfast room and onto the mudroom and garage.
- Previously the wall between the kitchen and living room was consumed by appliances and one smaller pantry. It hosted our refrigerator, which even at cabinet depth stuck out beyond the cabinets, microwave and oven.
- We opted to remove all appliances from the wall and replace the cabinets with 13″ wide cabinets (standard are 24″). While narrow, they allow a nice passageway and fit everything we need in our pantry effortlessly.
- To visually break the wall up, in the center there is a hutch to store and display platters and pie dishes, and a cabinet that bumps out an additional 4″ to host my cast iron pots and skillets.
- With a narrow wall of cabinets we were able to extend our kitchen island both in length and width. It now offers additional seating.
- The refrigerator was relocated to the far end of the kitchen that was previously defined for a kitchen table (we use the breakfast room). Consolidating wall ovens and stovetop to a single range also added space to our classic kitchen.
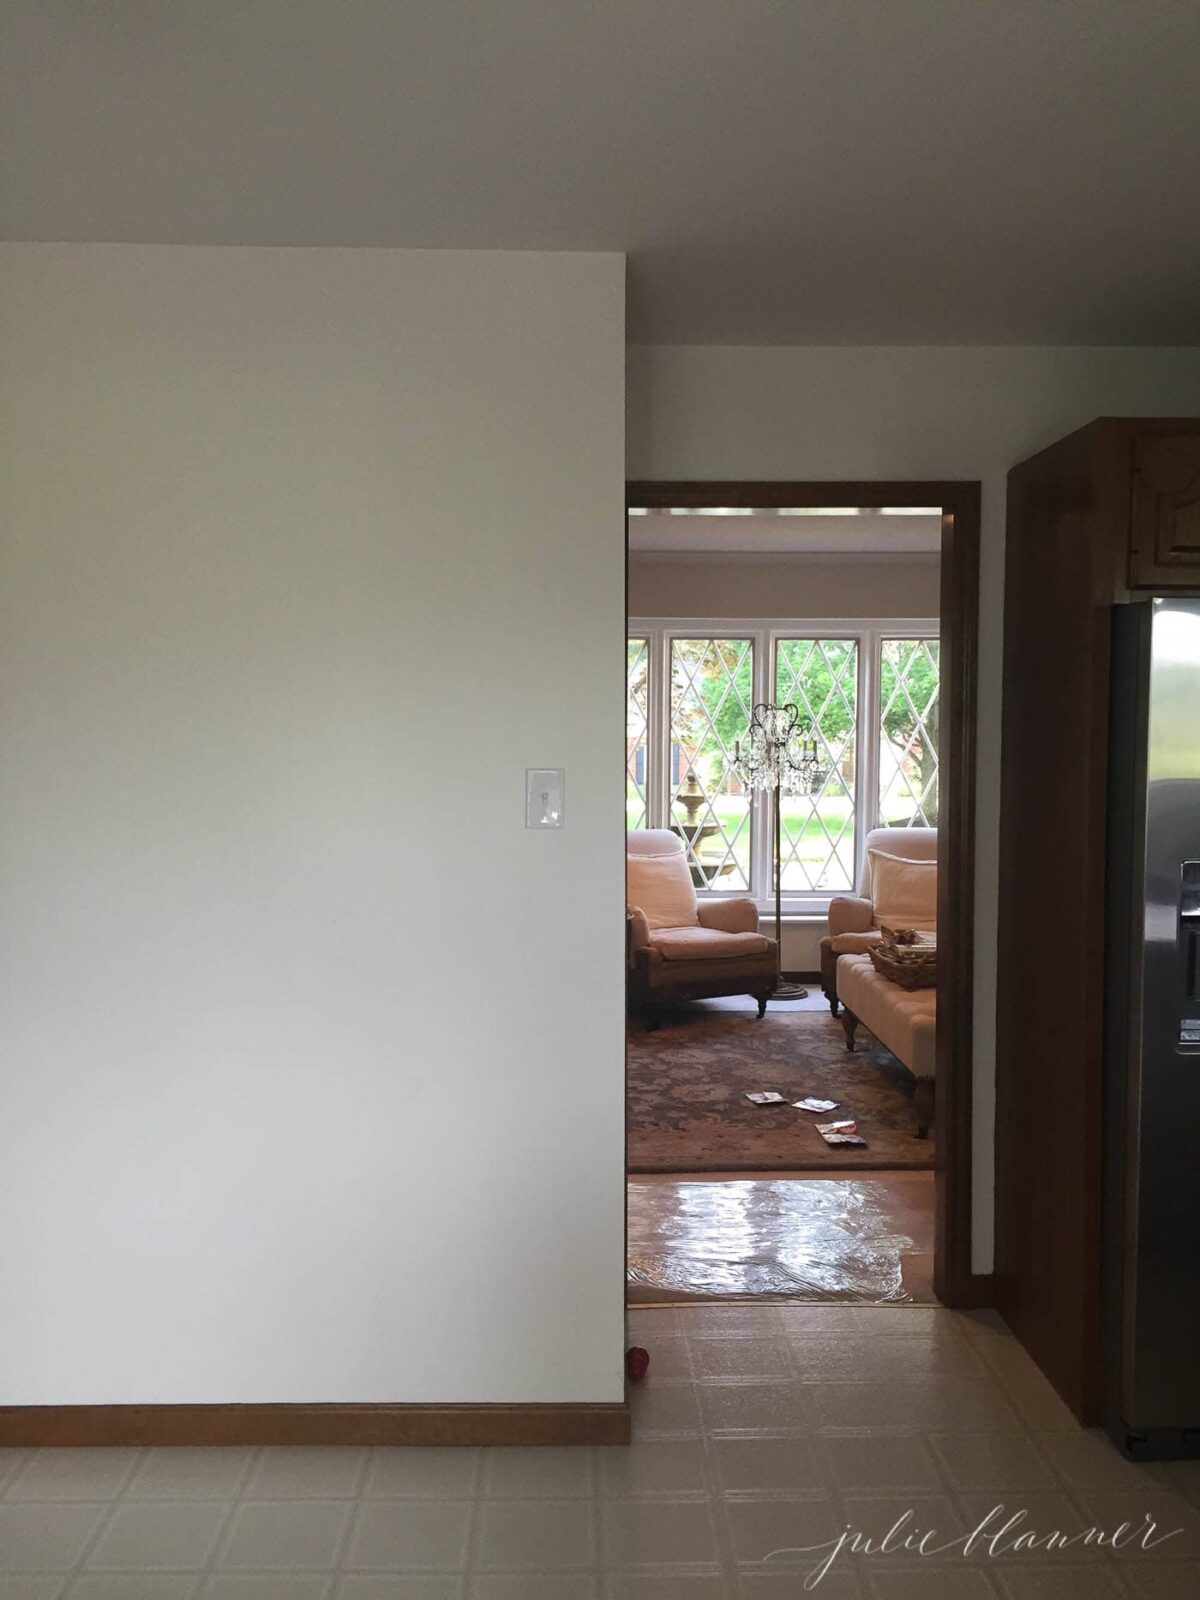
- We had a new kitchen window made the maximize size the space we had. While it was tempting to center the sink below the window in order to keep cabinets symmetrical, we opted for more light instead.
- Opening the 2 1/2′ doorway also allowed natural light to flow through our kitchen from the living room and breakfast room.
Amazon Storefront
Follow my Amazon Storefront to find more holiday looks for less.


I am so in love with your kitchen! I am wondering where can I find that little light that you’ve placed over your sink? I would love one in my kitchen. Thanks!
Thanks, Nicole! Schoolhouse Electric – they have a variety of bases and shades. Enjoy!
Hi Julie, beautiful kitchen. What paint color did you use for the ceiling?
Thank you! It’s Sherwin Williams “ceiling” paint. I think they use just a hint of color.
Hi. I love your kitchen. Where did you get your hardware? What companies do you suggest looking at for hardware?
I love your kitchen hardware. What company did you order them through?
You can find them in my shop and amazon shop, enjoy!
How do I find your Amazon shop, please? Thanks.
Hi Lauren! You can visit my Amazon storefront here. Enjoy!
Hi I love this! Do you mind sharing where the paper towel holder and soap caddy are from? Thank you!
Hi Brenna,
Thanks so much for your kind words. Both of those items are sold out, but I’ve got great duplicates linked in this post: https://julieblanner.com/eliminate-countertop-clutter/
Enjoy, and thanks for reading!
Julie
Julie, I could look at your kitchen all day long! I can’t get enough of the details and the “why” behind your warm and inviting design. I especially love the hutch area. Love the video too. Happy New Year!
Thank you, Linda! I appreciate your kindness and support! Hope you are having the happiest New Year!